1 Open the designer
To start designing the HTA, go to the Settings menu, then Create HTA. The designer opens. If you already created an HTA, it is shown in the middle of the designer.
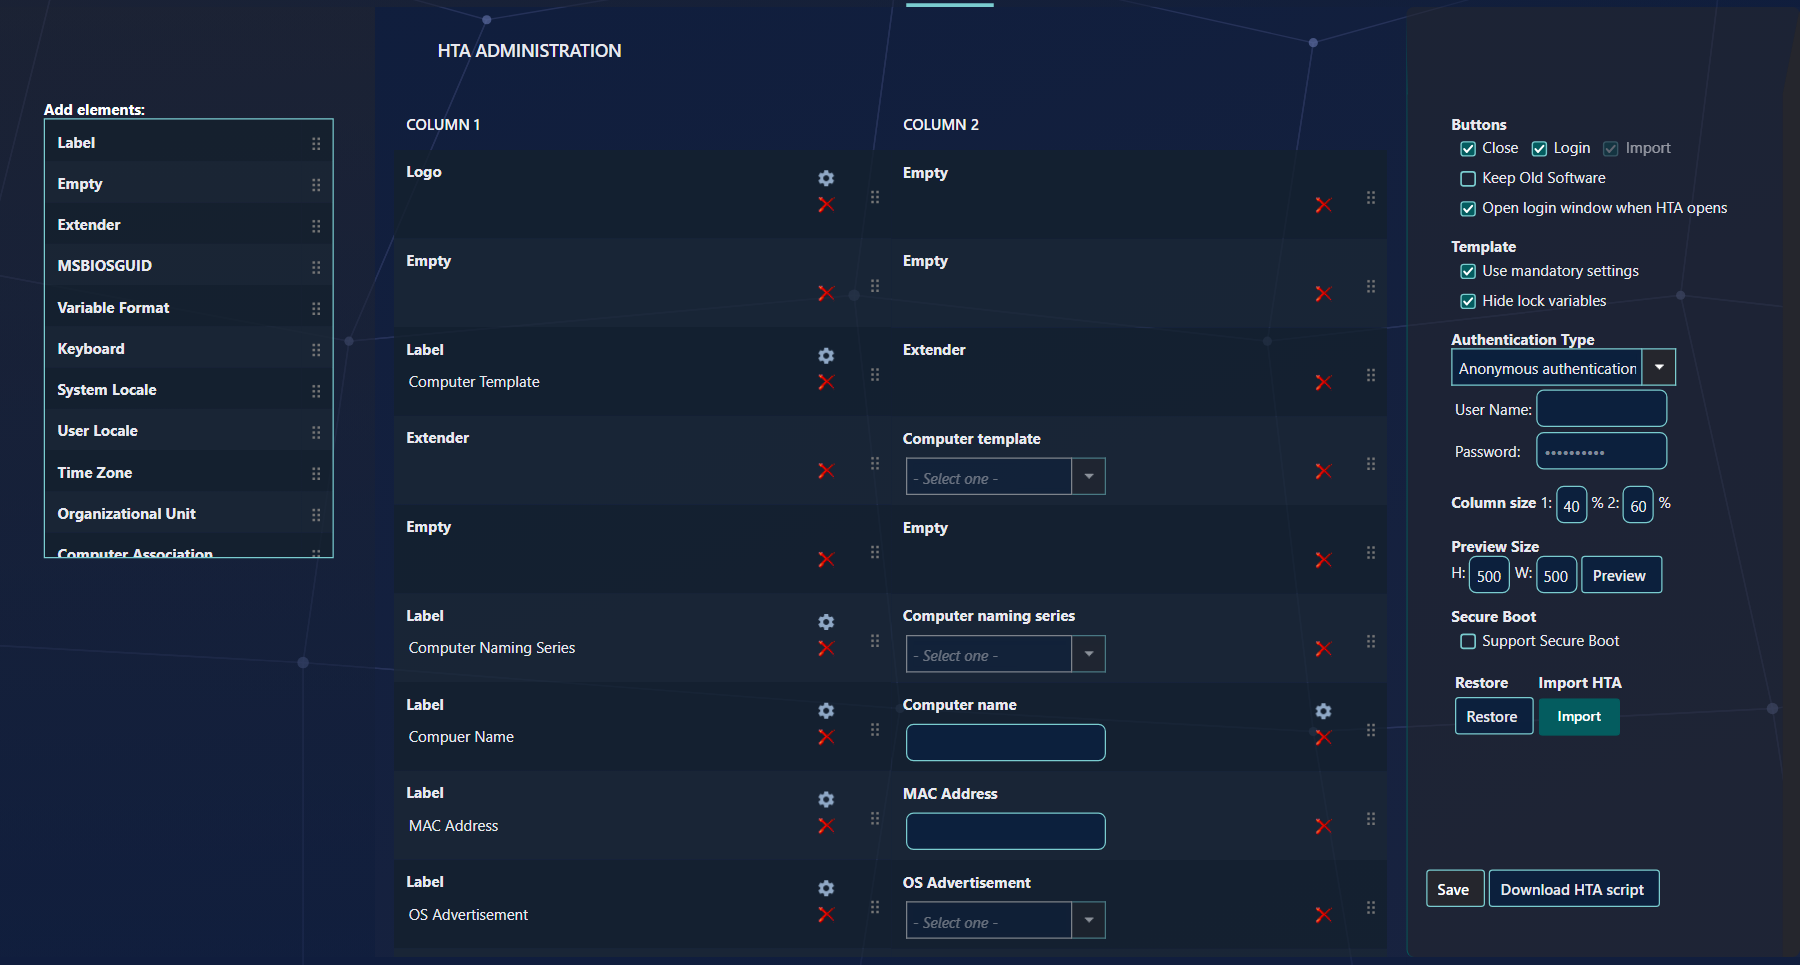
- Add elements (left): the elements you can add to the HTA. Drag an element from here into column 1 or column 2.
- Middle: the two columns. Only the elements in these two columns are in the HTA.
- Right: the HTA settings, with Restore and Import above Save and Download HTA script.
2 Import HTA
You can import a premade HTA from an XML file.
The file must be a SoftwareCentral HTA XML file, and all custom variables in the HTA must exist in the system. Press Import and choose the file. A warning says that the existing HTA will be overwritten.
3 The standard HTA and Restore
SoftwareCentral has a standard HTA. You can put it back with Restore.
Press Restore to replace the current HTA with the SoftwareCentral standard HTA. The current HTA is removed. Before you press it, the warning text says that the existing HTA will be overwritten by the default HTA.
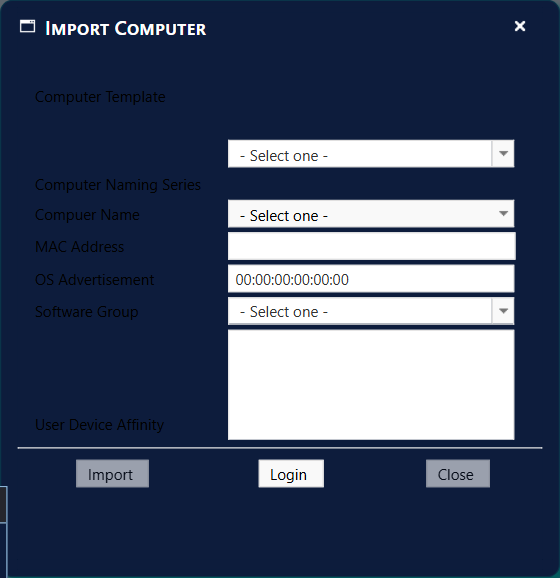
The standard HTA:
| Setting | Standard value |
|---|---|
| Authentication Type | Anonymous authentication |
| Buttons | Close and Login are shown, and the login window opens when the HTA opens |
| Template | Use mandatory settings and Hide lock variables are ticked |
| Column size | 40 % and 60 % |
| Preview Size | 500 high and 500 wide |
4 HTA settings
The settings are in the right-hand panel. They apply to the whole HTA.
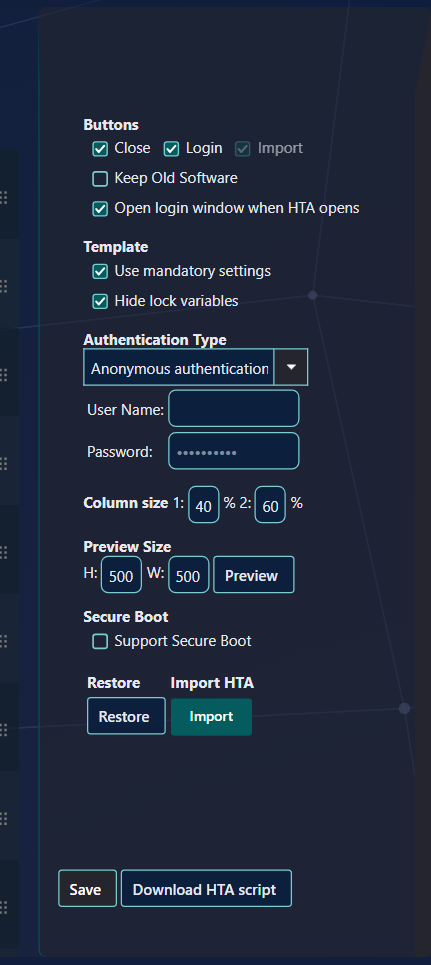
Buttons
There are two optional buttons, beside the Import button, which is always shown.
- Close closes the HTA and cancels the import of the unknown computer. An import cannot be cancelled after the Import button in the HTA is pressed.
- Login opens a login window, where the Windows user can be changed. Use it with anonymous authentication, or when a user started the HTA with the wrong account.
- Open login window when HTA opens is available only when Login is ticked. It opens the login window as soon as the HTA starts.
- Keep Old Software shows a Keep Old Software check box in the HTA for known computers.
Template
In SoftwareCentral computer templates, each machine or custom variable can be set to mandatory or locked. The HTA uses these settings:
- Use mandatory settings: a variable that is mandatory in the template is used in the HTA, and a small red star is shown beside it.
- Hide lock variables: a locked variable is hidden in the HTA.
Authentication Type
There are two ways the HTA can authenticate the user who performs the import.
- Windows authentication: the HTA uses the Windows user. SoftwareCentral gathers all the roles this user is a member of, and shows the templates and advertisements for those roles. This is like the normal import known from SoftwareCentral.
- Anonymous authentication: all previously run task sequences on the client are shown. Otherwise the user must log in to get the available settings.
With anonymous authentication you can set a fixed user in User Name and Password. The HTA then uses this user to show the available task sequences and templates. The user name needs its domain: write DOMAIN\user or user@domain. When you save, the account is checked against Windows. If you leave the password box empty, the password entered earlier in this session is used.
Column size
This setting determines how wide each of the two columns is in the HTA. The two numbers must add up to 100; if they do not, the columns are set to 50 and 50 when you save or preview. If a single-column HTA is used, this setting is not used.
Preview Size
The H (height) and W (width) boxes set the size of the Preview window. An empty box or 0 means 500. Preview opens the HTA in a window and does not save it.
Secure Boot
Tick Support Secure Boot to support Secure Boot. Its tooltip says: If the computer is known, the HTA will close.
5 HTA elements
The elements you can add are in the Add elements list on the left.
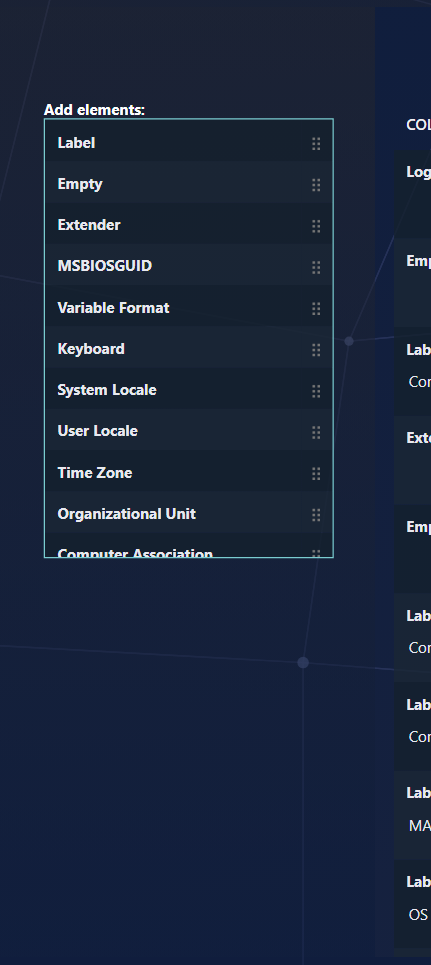
Label
A label shows a text. When you drop a label into one of the two columns, a window opens where you type the text and the tooltip.

Empty
An empty element is a field you can use to add empty space in the HTA.
Extender
An extender element makes the field next to it fill both fields. In the designer, the Computer template drop-down fills two fields, because an extender sits beside it.
Logo
A logo element shows the company logo. The logo path is set in Settings (Logo path); the logo must be 300 x 100 pixels. You can change it at any time.
Computer name
The computer name element can be checked with a regular expression. Use this if your naming convention is not supported by the automatic computer naming of SoftwareCentral.
Press the gear icon at the top right of the element. In the window that opens, type the expression, then test it: type a valid and an invalid computer name in the test box. Save keeps the expression, Cancel closes the window, and Reset removes the expression.
Other
All other elements in the list represent a computer variable or an element used in the import process.
- Computer name
- MAC address or SMBIOSGUID
- OS advertisement
6 Working with elements
The designer is a drag and drop interface. Elements can be moved around.
Only the elements in the two middle columns are in the HTA. You can preview the HTA at any time while you work, with the Preview button in the right-hand panel. The preview does not save the HTA.
To add an element, drag it from the Add elements list into column 1 or column 2. To move an element, drag it by its drag handle to the new position. A dotted line shows where the element will be dropped.

Removing elements
Three element types can be removed by clicking the close button in the top right corner of the element: Empty, Label and Extender.
All other elements are removed by being dragged back to the left side of the menu.
The trash icon in the header of column 2 (tooltip Clear HTA) removes all elements from the designer. Nothing is saved until you press Save.
7 Saving the HTA
Press Save in the lower right corner when every element is in place, and wait for the process to finish.
If an element is missing, a red message appears above the buttons, for example Invalid HTA, missing Computer Name. Add the element and press Save again.
When the save succeeds, the HTA is stored in SoftwareCentral, and the HTA script is written to the install directory of SoftwareCentral, under /Uploads/HTA, as the file HTA_Dynamic.hta. The browser also downloads the file.
Download HTA script creates the same script from the current design and downloads it, without saving the design.
8 Best practice
- Keep the three mandatory elements. A design without the computer name, the MAC address or SMBIOSGUID, or the OS advertisement cannot be saved.
- Use a dedicated account for a fixed user. With anonymous authentication the account is checked against Windows when you save, so use an account that is meant for the HTA and not a personal one.
- Write down the layout before you import or restore. Import and Restore replace the current HTA, and this designer has no Export button.
- Preview before you save. The preview shows the HTA without storing it, so you can check the buttons and fields first.
- Tick Use mandatory settings and Hide lock variables when the HTA should follow the computer templates. Then mandatory variables are shown with a red star, and locked variables are hidden.
9 Troubleshooting
| Symptom | Cause | What to do |
|---|---|---|
| Invalid HTA, missing MAC address or SMBIOSGUID, Computer Name, OS Advertisement (the list shows the missing elements) | One or more of the three mandatory elements is not in the columns. | Drag the missing element from Add elements into a column, then press Save. |
| User not valid | The fixed user name and password did not pass the Windows check. | Check the user name, the domain and the password, and save again. |
| No domain detected in username | The user name has no domain part. | Write the user name as DOMAIN\user or user@domain. |
| Importing a file does nothing, and no message appears | The file could not be read as a SoftwareCentral HTA XML file. The import is cancelled and the reason is not shown. | Choose a SoftwareCentral HTA XML file, and make sure all custom variables in it exist in the system. |