1 About the Application Manager Only edition
The Application Manager Only edition is a focused, lightweight configuration of SoftwareCentral for teams that only need application and package management. Its interface is streamlined to four work areas and defaults to the dark theme.
What's included
| Area | Purpose |
|---|---|
| 📦 Apps | Create and manage applications and packages in ConfigMgr and/or Intune. |
| 🤖 Robopack | Automated, always-up-to-date application packaging via the Robopack service. |
| 🌊 Flows | Patch / update flows that keep applications current automatically. |
| 📡 Radar | Detection and discovery view for installed / available software. |
| ⚙️ Setup Guide | A guided, in-app checklist (covered in section 7) to finish configuration. |
Features that belong to the full product (device management, deployment manager, AD delegation, reporting, the shop, etc.) are intentionally hidden in this edition.
2 Installation overview
The complete process, at a glance:
3 Prerequisites
Pick the column that matches your environment. Both share the same Windows Server baseline.
Azure / Entra Intune only
- Windows Server 2019+ with Desktop Experience and internet access.
- Only SoftwareCentral (and optionally SQL) on the server. TCP 8080 free.
- SQL Server 2019+ / Express, or Azure SQL (auto-pause disabled).
- A local service account with local administrative rights.
Accounts you'll sign on with during setup
- Local administrator on the server.
- Account able to create a SQL database and add logins/users.
- Account able to register an Entra ID app, assign permissions and grant admin consent.
An Azure database must be in the same tenant as the app registration created during setup.
ConfigMgr ConfigMgr edition
- Web server (Windows Server 2019+) for SoftwareCentral and its services.
- SQL Server / Express 2019+ or Azure SQL; SQL server and DB on the same collation (recommended
SQL_Latin1_General_CP1_CI_AS). - A local AD or Entra ID administrator group for SoftwareCentral admins.
Service account permissions
- Read/write/execute on the SoftwareCentral DB (not for Azure SQL).
- Read/execute on all ConfigMgr site databases.
- Local admin, Log on as a service, Act as part of the OS, Replace a process level token, Adjust memory quotas.
The account must also read users, groups and memberships from AD. See the ConfigMgr security role in the appendix.
Windows Server minimum requirements
- Windows Server 2019 or above
- IIS 10 or above
- .NET Framework 4.8 or above
- IIS URL Rewrite Module 2.1+ (download)
- Dual-core CPU or above
- 8 GB RAM or above
- 10 GB free disk or above
- SQL Server / Express 2019 or above
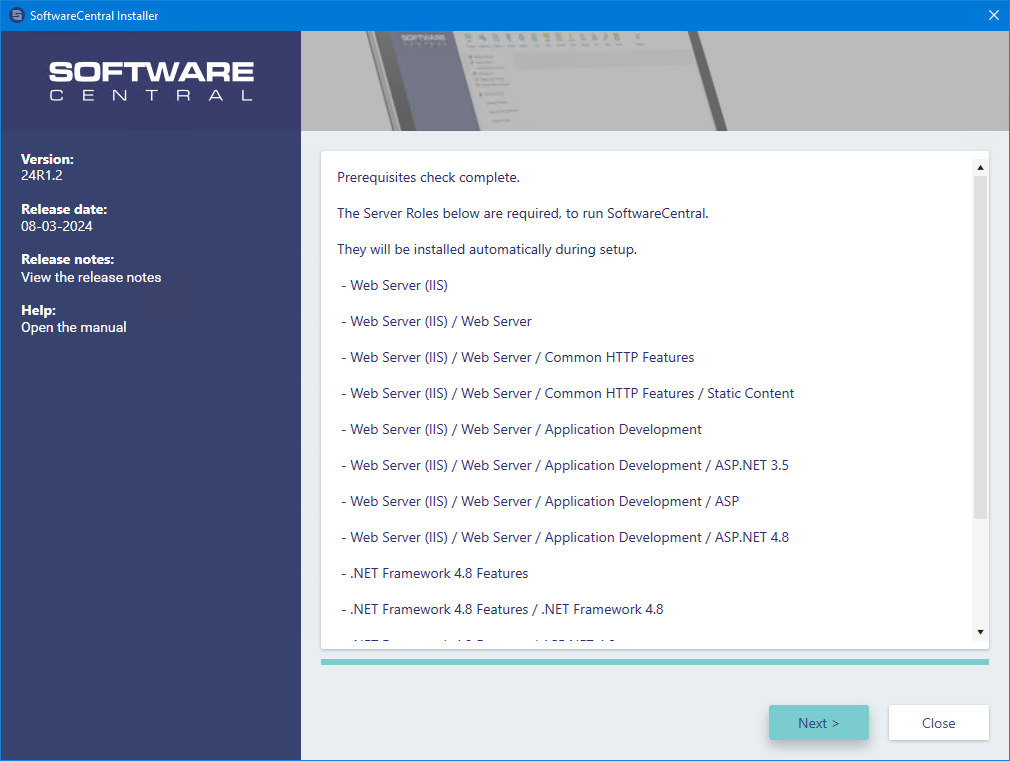
Required server roles/features (IIS, ASP.NET 3.5/4.8, Windows Authentication when used) are installed automatically by the installer if missing. Firewall ports are listed in the appendix.
📄 Detailed page: Prerequisites · original: Prerequisites
4 Azure App Registration Azure / Entra
For Azure OpenID authentication and Intune connectivity you need an Entra ID app registration. The SoftwareCentral installer can create this automatically — do the manual steps below only if you prefer to prepare it in advance or reuse an existing one.
- Azure portal → your Entra ID → App registrations → New registration.
- Give it a name; choose single- or multi-tenant. Do not set a Redirect URI yet. Click Register.
- On the overview page, copy the Client ID and Tenant ID — you'll need them in the installer.
- Add a platform → Web. Enter the SoftwareCentral host name; set the front-channel logout URL to the same host followed by
/logout. Tick ID tokens. Do this for both the localhost and the regular binding.
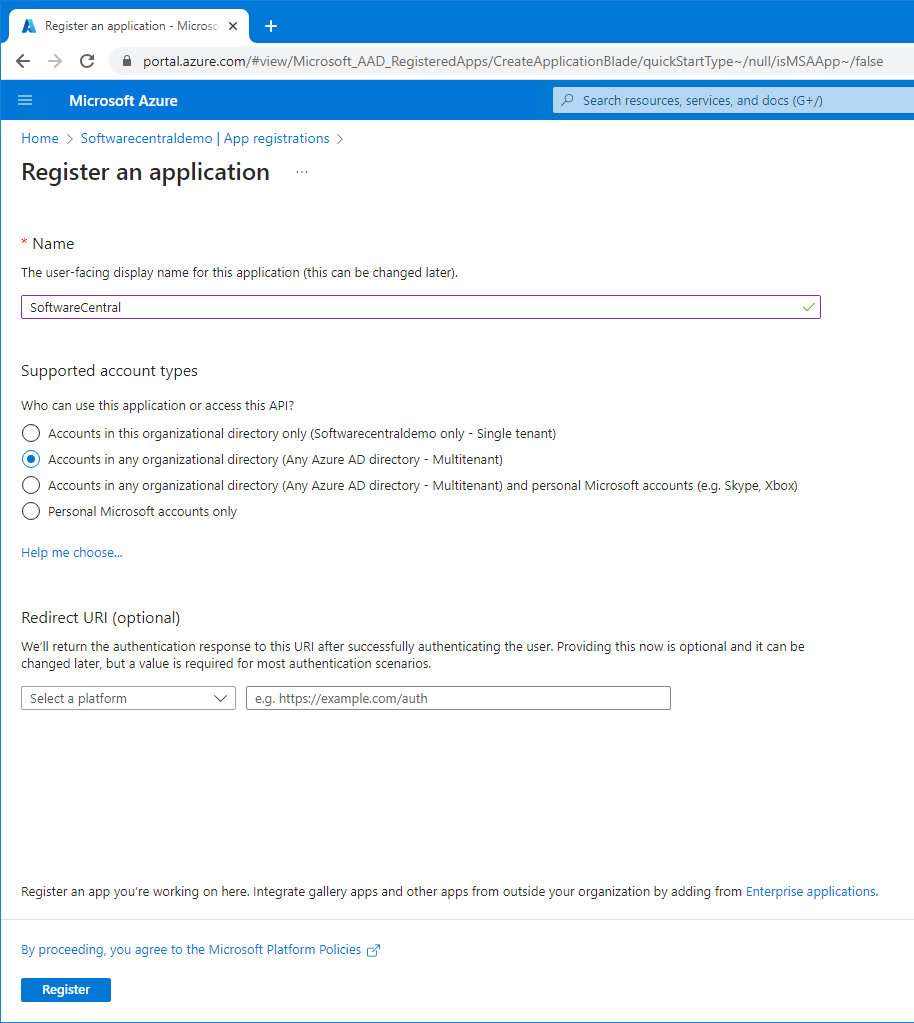
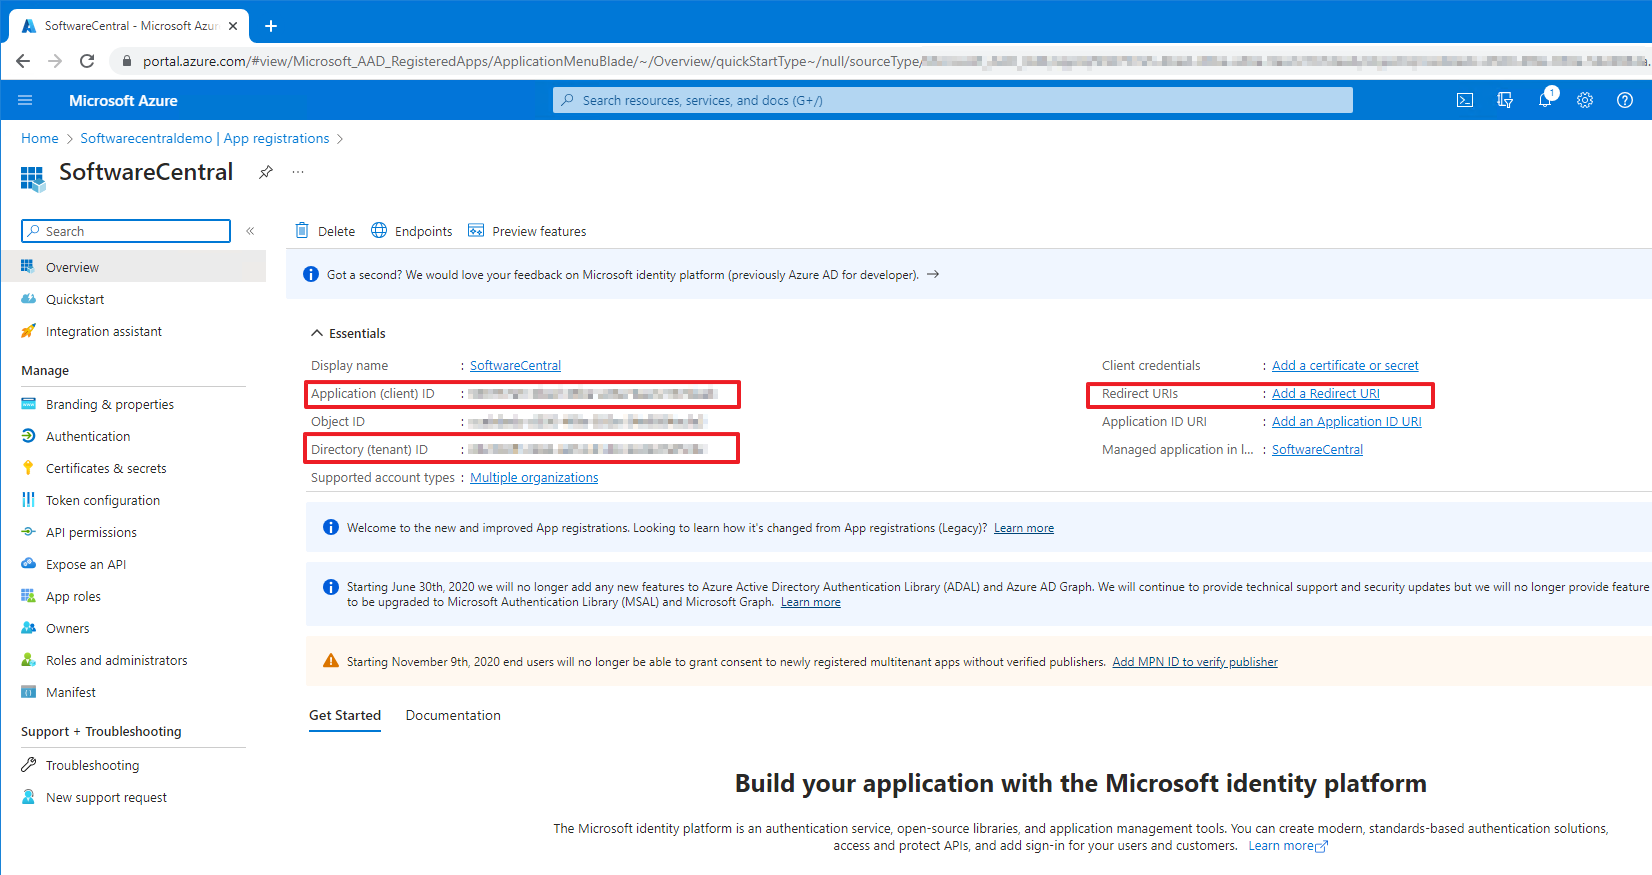
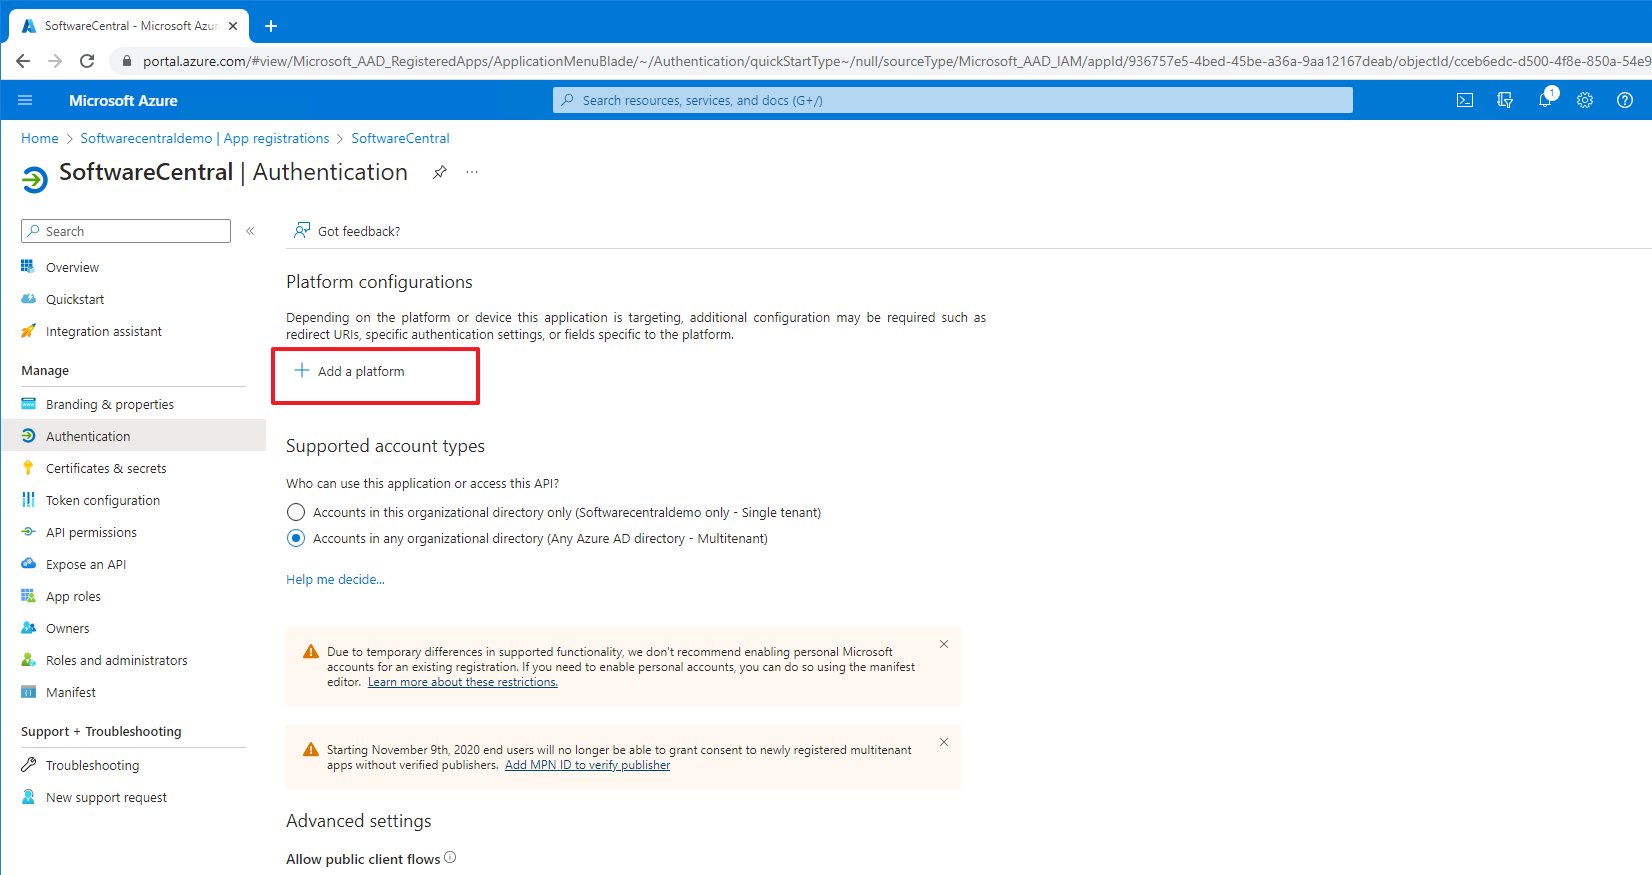
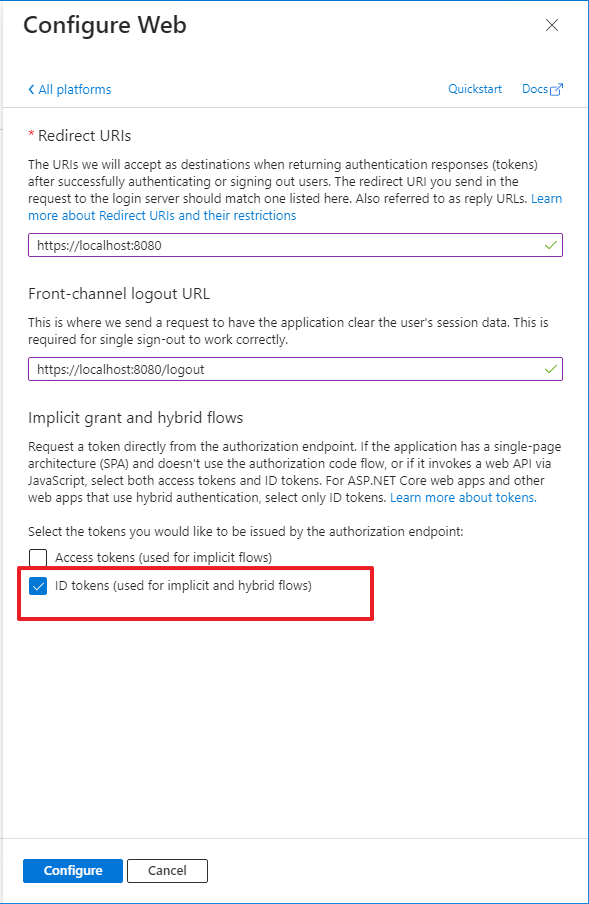
/logout URL; tick ID tokens.Images show the standard installer flow; the Application Manager Only build is identical for these Azure steps.
📄 Detailed page: Azure App Registration · original: Create App Registration for Azure OpenID Authentication
5 Run the installer
Download the installer from SoftwareCentral Update and run it on the web server. Steps may vary slightly with your choices.
Step 5.1 — Requirements check
The first screen validates that the server meets the minimum requirements. Follow any prompts.
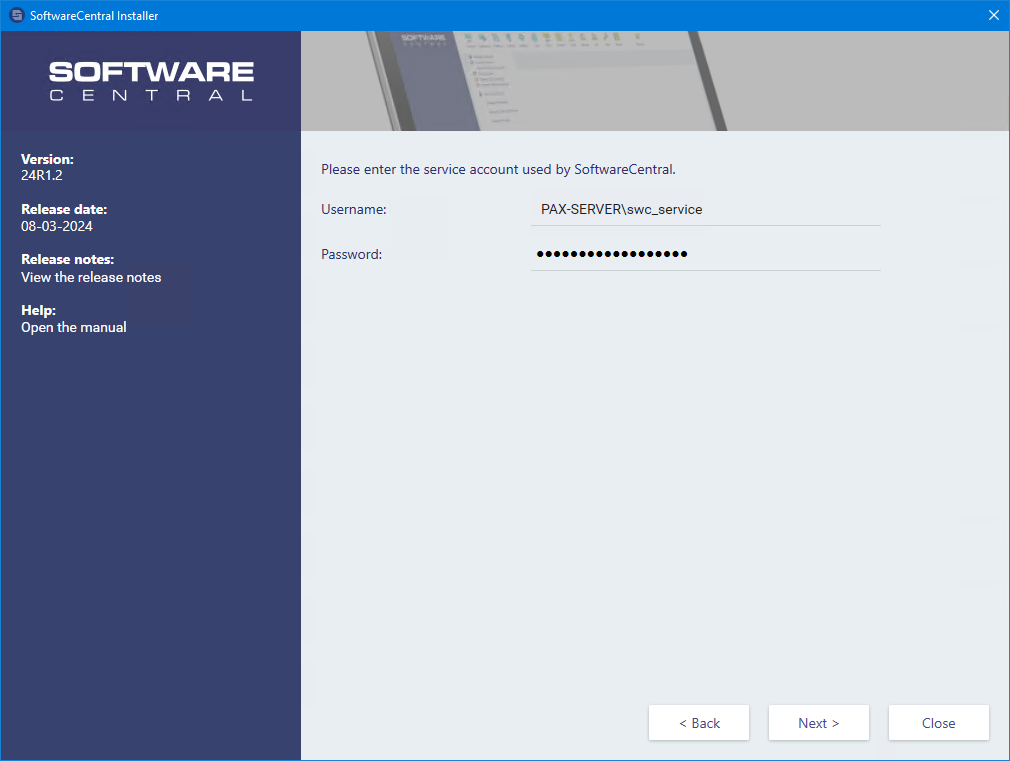
Step 5.2 — Service account
Enter the service account credentials. For ConfigMgr / hybrid this must be a domain user; for Intune only it can be a local account as servername\username. The account must be a local administrator.
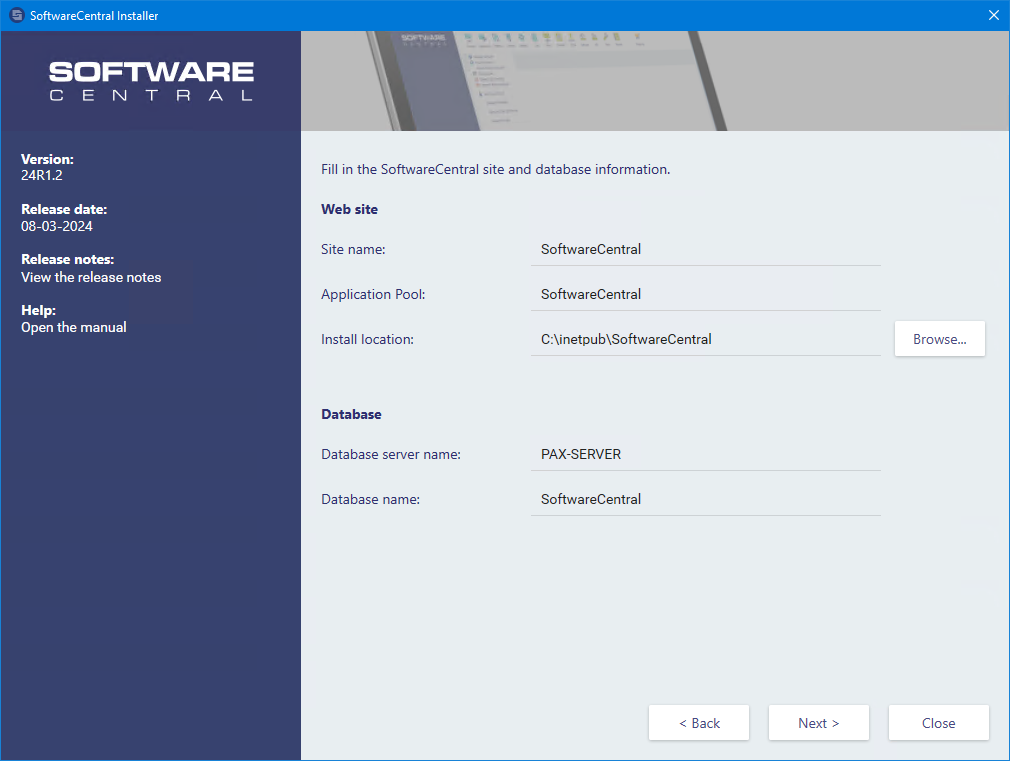
Step 5.3 — Site & database information
Accept the default names and paths where possible. Enter the SoftwareCentral database server (use servername\instance for a named instance, or servername.database.windows.net for Azure SQL).
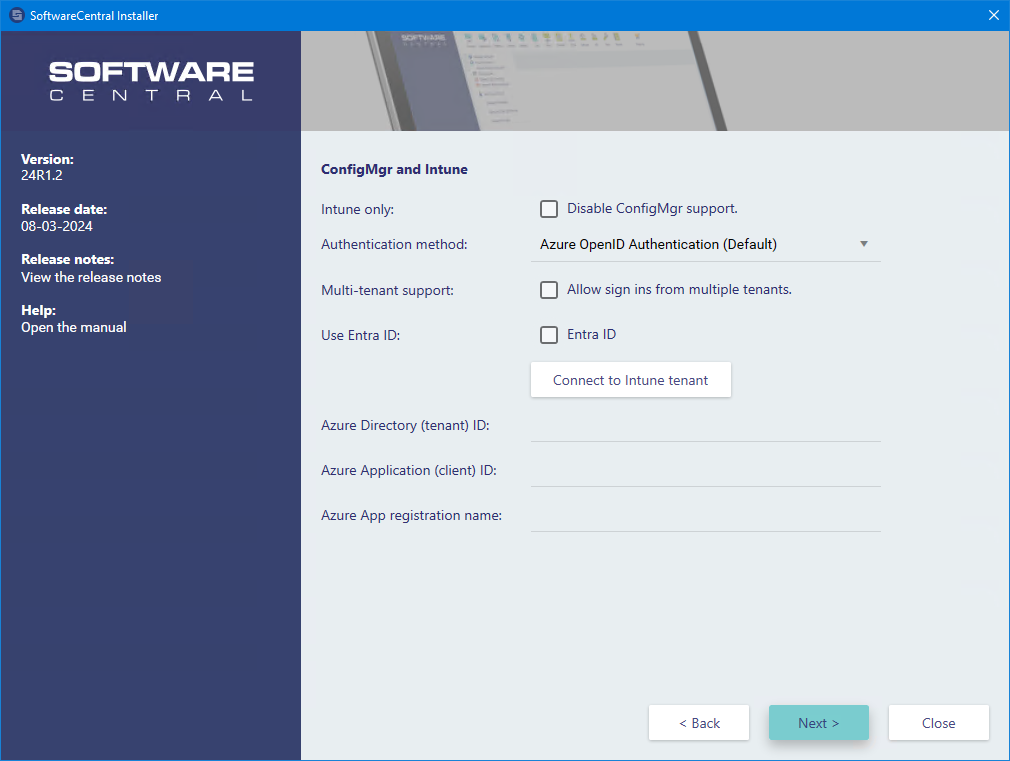
Step 5.4 — Edition, authentication & Intune
- ConfigMgr support: choose Disable ConfigMgr support for an Intune-only install. Azure / Entra
- Authentication: Azure OpenID (default; work-account sign-in, MFA, SSO) or Windows Authentication (on-prem AD, domain users only).
- Multi-tenant support: allow users from multiple Intune tenants (only added tenants can sign on).
- Use Entra ID: source group memberships from Entra ID instead of on-prem AD.
- Connect to Intune tenant: creates/updates the app registration automatically — or enter an existing Tenant ID / Client ID. After connecting, grant admin consent using the link shown.
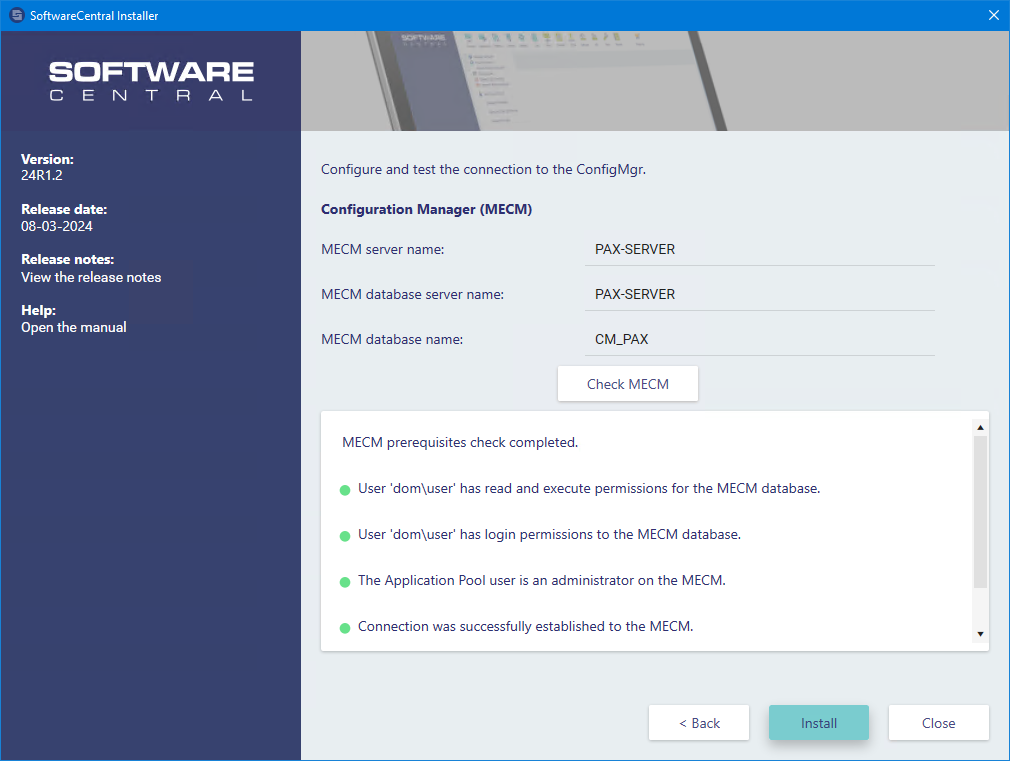
Step 5.5 — ConfigMgr connection ConfigMgr
For ConfigMgr installs, enter your Configuration Manager (MECM) details and click Check MECM to verify the connection and create the MECM database login. Assign permissions manually if the installer cannot (see the security role XML).
Step 5.6 — Install
Click Install. For Azure SQL you'll be prompted to sign in with an account that can add logins/users. Errors are highlighted with suggested fixes; details are written to SoftwareCentralInstaller_Log.txt next to the installer.
📄 Detailed page: Run the installer · original: Install SoftwareCentral
6 First-time configuration (from localhost)
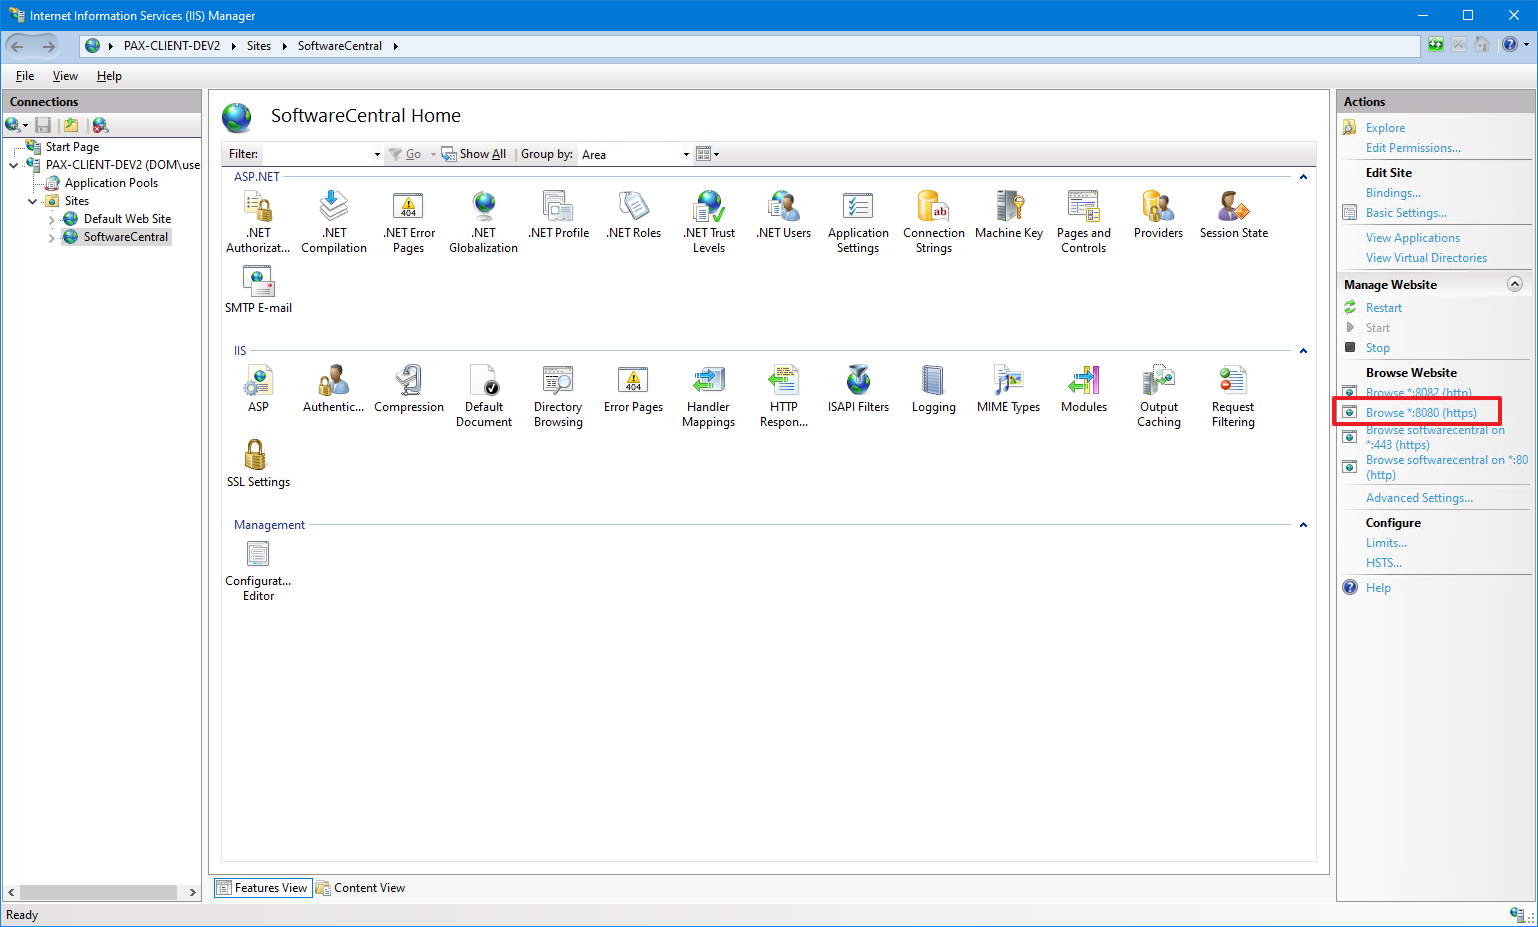
The first configuration must run on the server, from the localhost binding — a security measure so remote connections can't change critical settings. In IIS Manager, select the SoftwareCentral site and click Browse *:8080 (https).
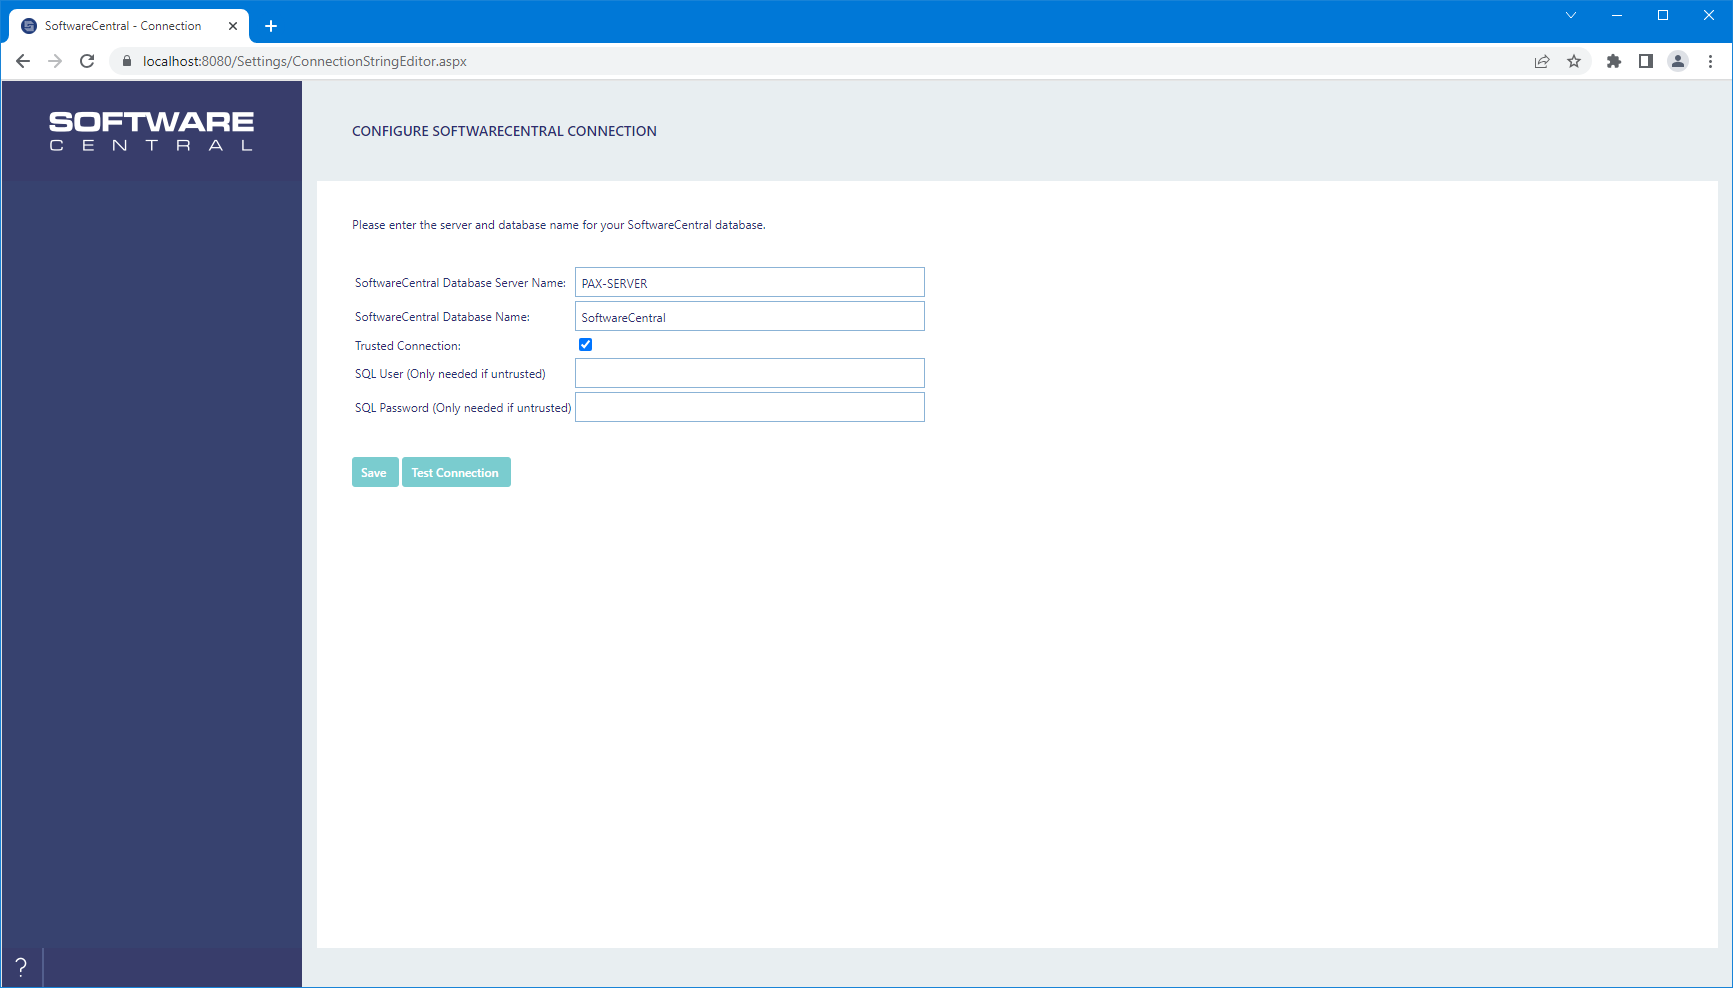
6.1 — Database connection
The database details are pre-filled. Click Test to confirm connectivity, then save and continue.
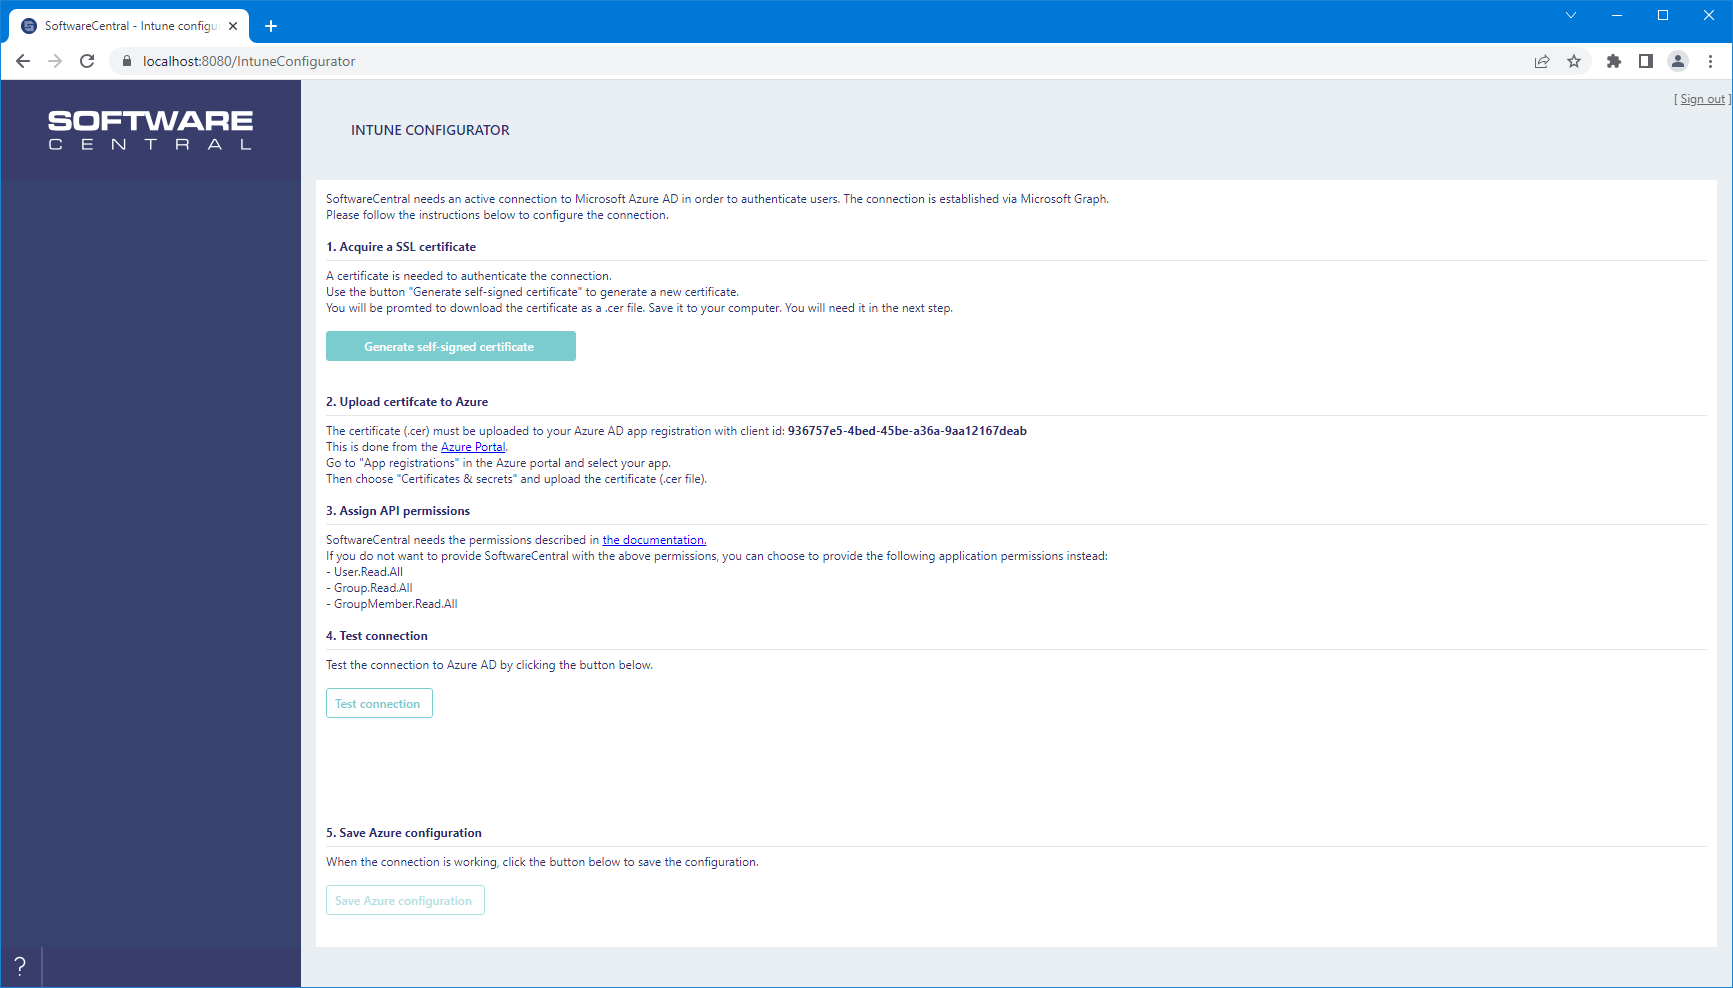
6.2 — Intune configurator Azure / Entra
If Intune wasn't configured in the installer, this screen appears. Generate a certificate and upload it to the app registration, assign the required permissions, and Test. Then Save Azure configuration.
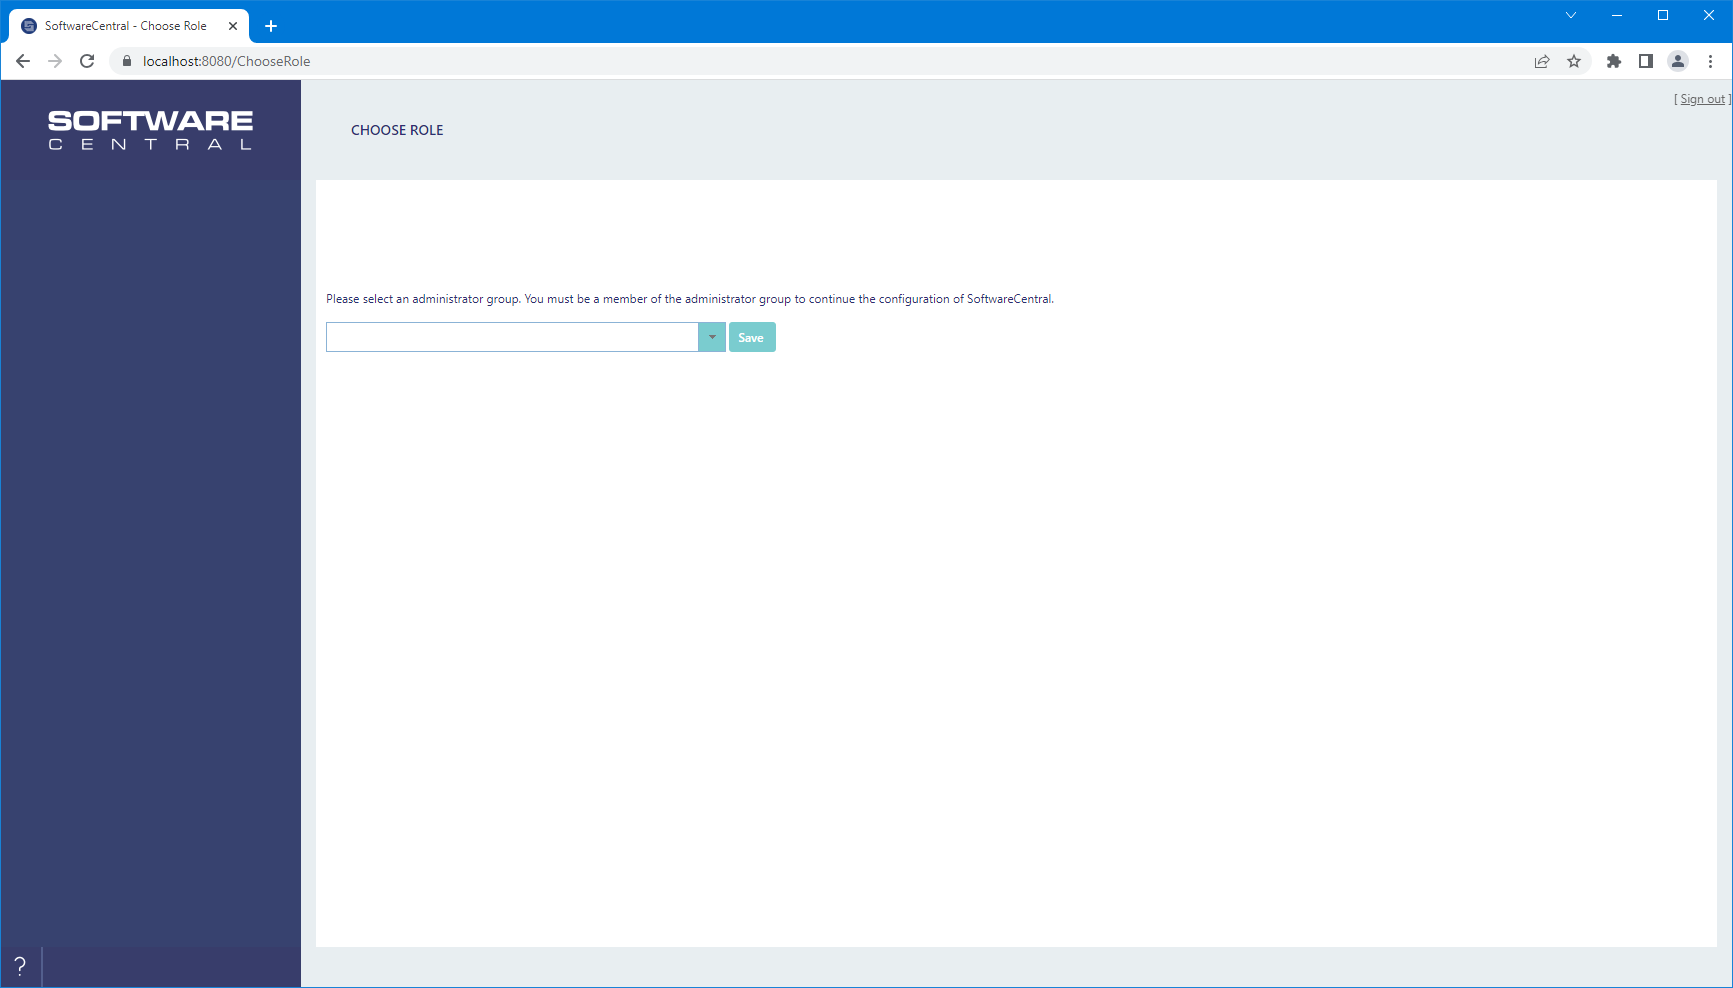
6.3 — Administrator group
Choose the administrator group (you must be a member). With Entra ID you can also create the group here and be added automatically.
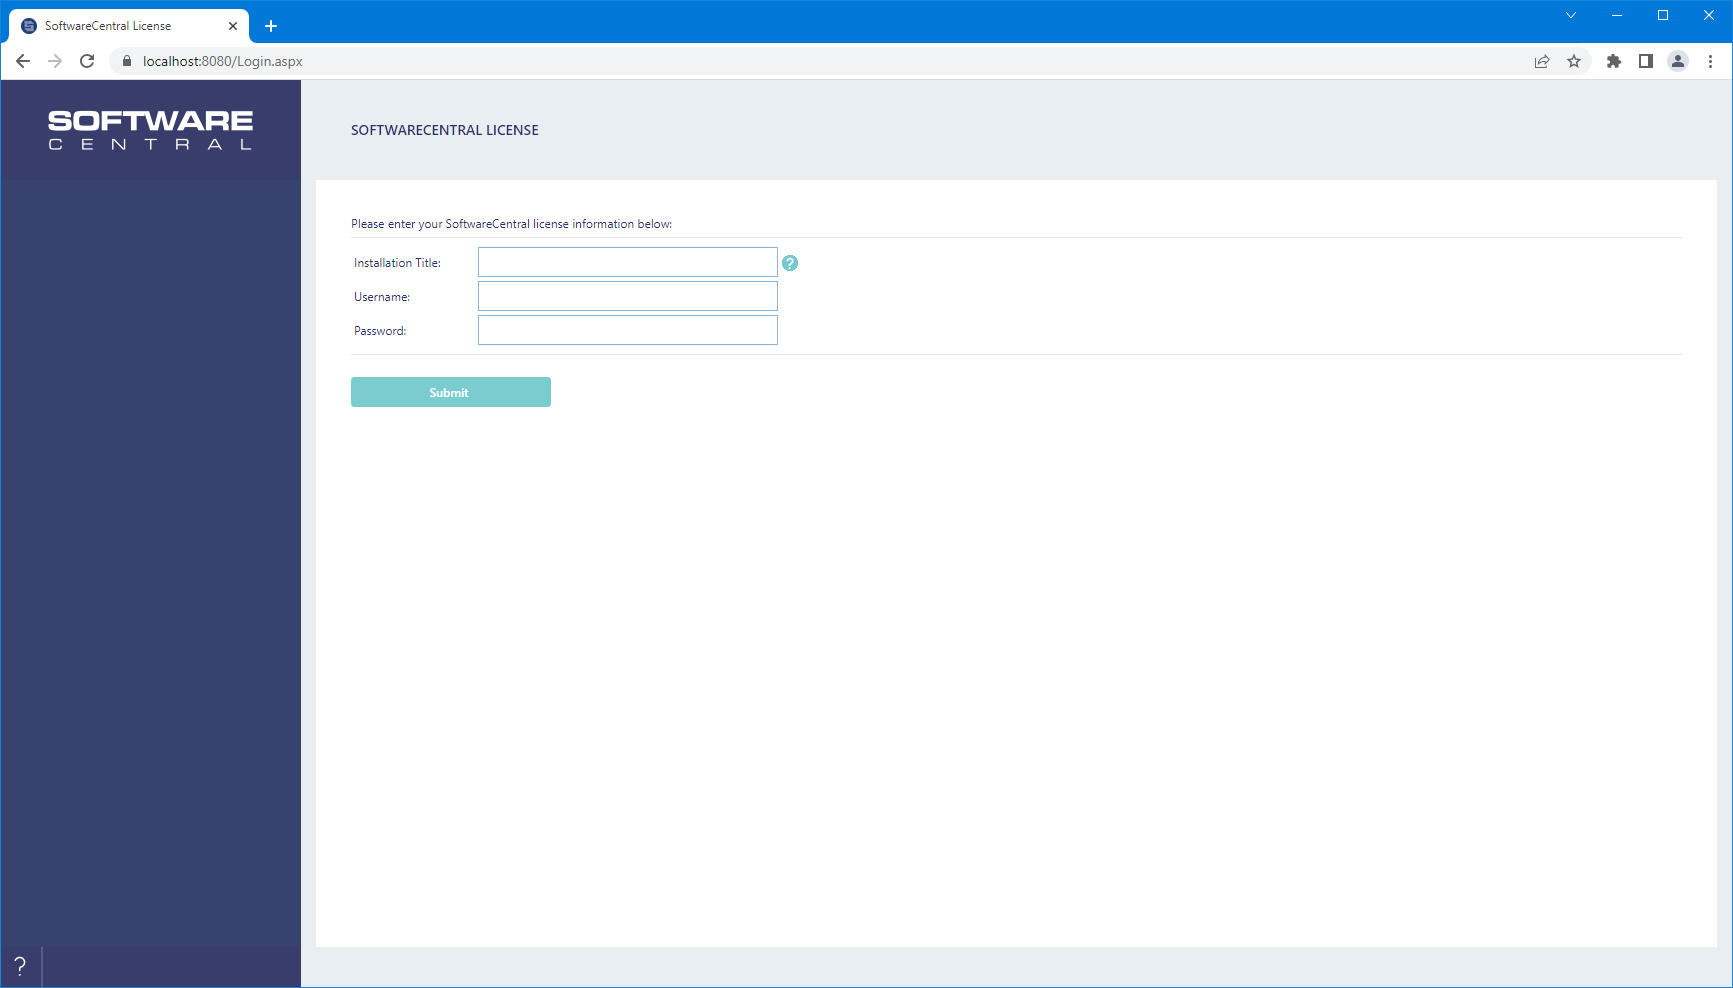
6.4 — SoftwareCentral license
Enter the username/password from your retailer (online), or exchange the shown installation key for an offline license key. An Installation Title helps identify multiple installations. You cannot proceed without a valid license.
6.5 — Verify settings
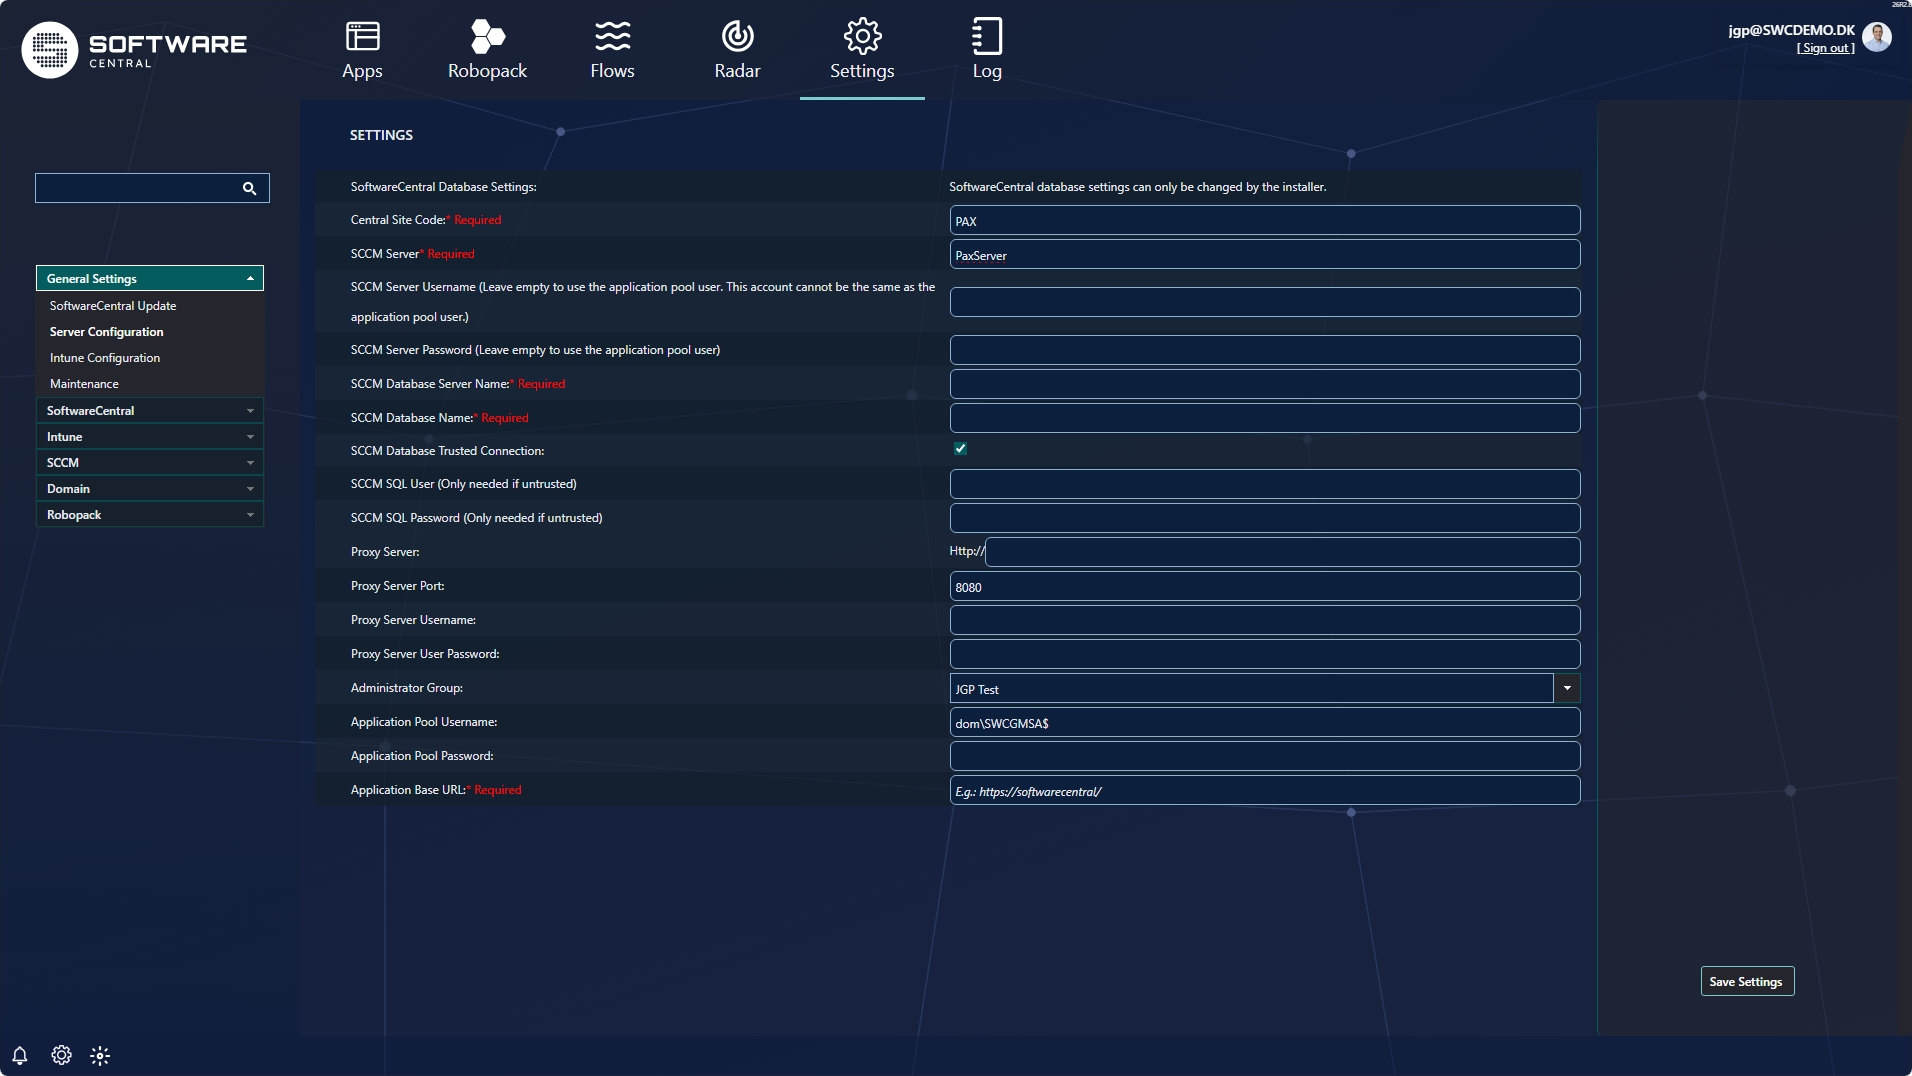
After the license step you land on the Settings interface. Mandatory fields are marked * Required in red and must be filled in before you continue — for example the Central Site Code, SCCM Server, SCCM Database Server Name/Name and the Application Base URL (e.g. https://softwarecentral/). Complete them and click Save Settings.
6.6 — SCCM Folders and Collections ConfigMgr
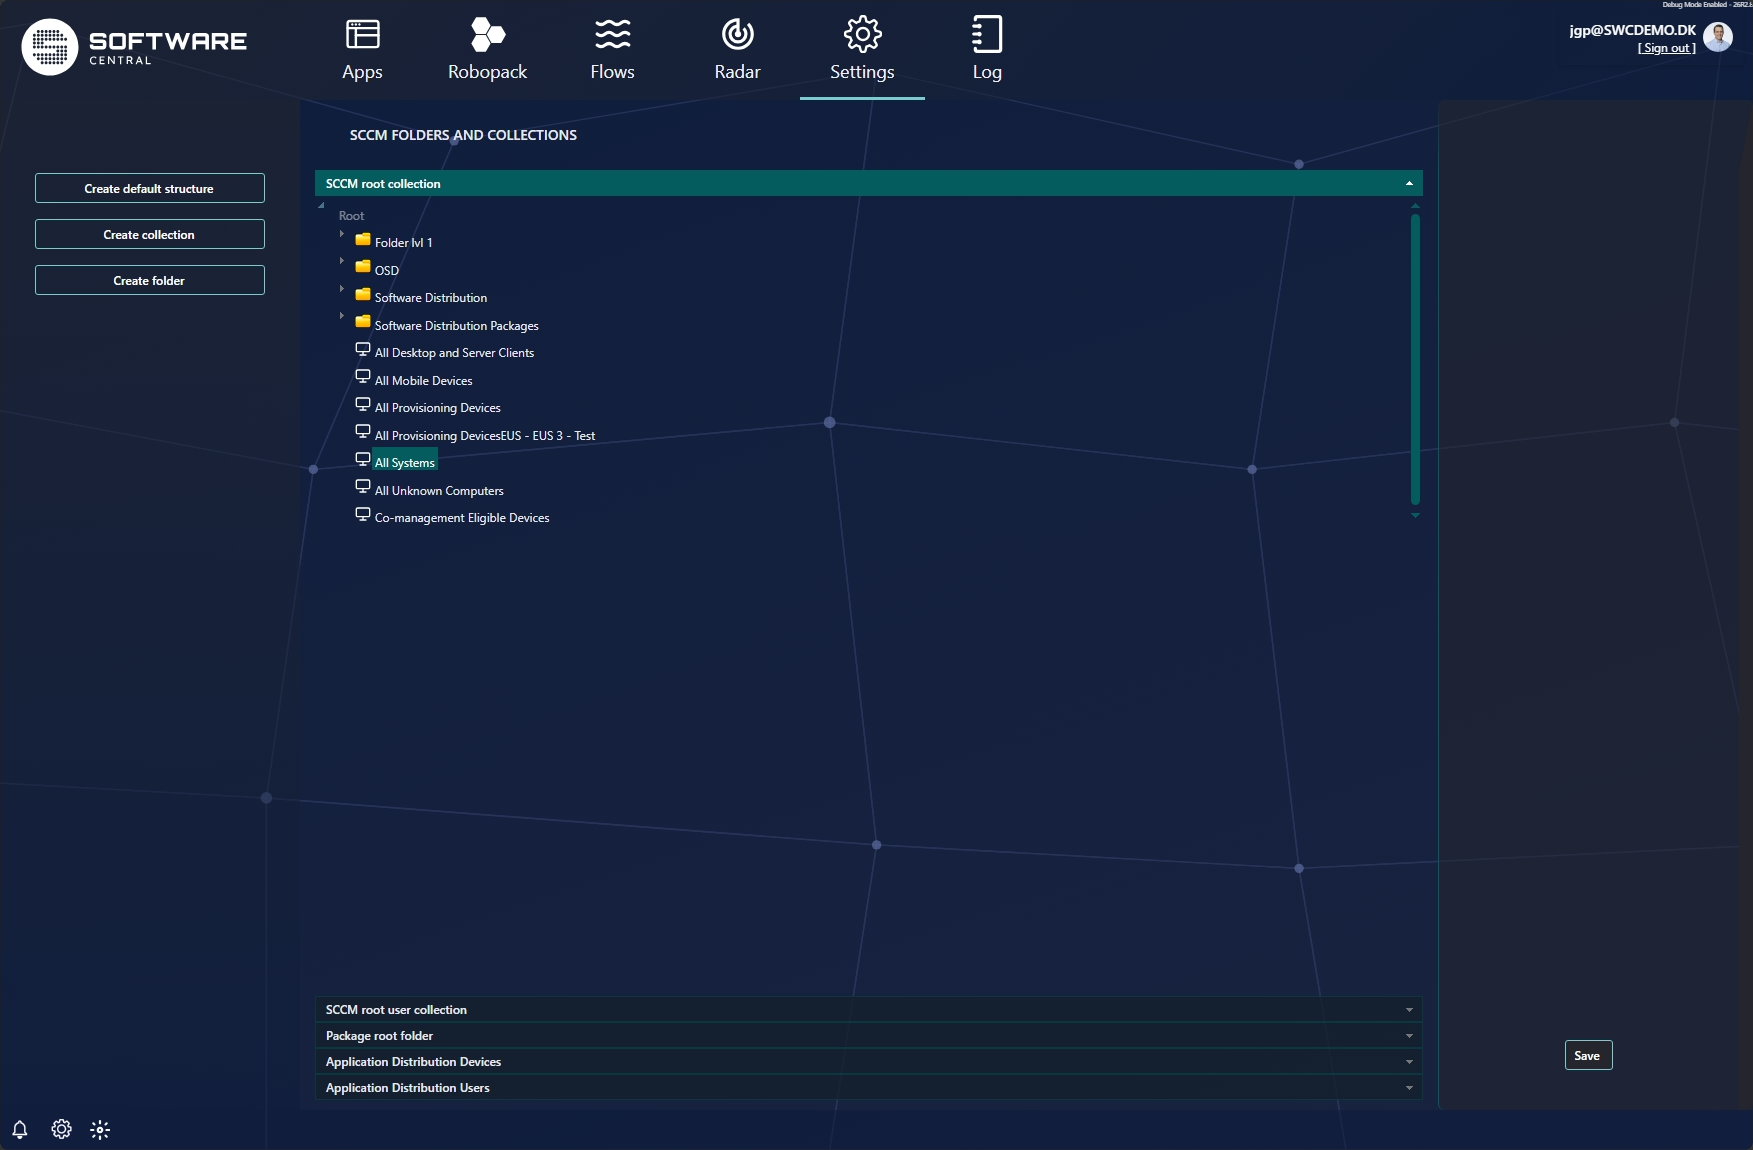
Once the mandatory settings are saved, go to Settings → SCCM Folders and Collections and set up the default collections and folders. SoftwareCentral uses this structure to find the correct collection to use when it creates, deploys and reads packages and applications.
Configure each root by selecting a node in the tree and saving it:
- SCCM root collection (devices) and SCCM root user collection
- Package root folder
- Application Distribution Devices and Application Distribution Users
Click Create default structure to have SoftwareCentral build its own default structure automatically, or point the roots at your existing structure and use Create collection / Create folder as needed.
For a full explanation of the structure SoftwareCentral expects — and how to use your own — see Default Collection Structure and Custom Collection Structures.
📄 Detailed page: First-time configuration · original: Configure SoftwareCentral for the first time
7 Application Manager Setup Guide (in-app)
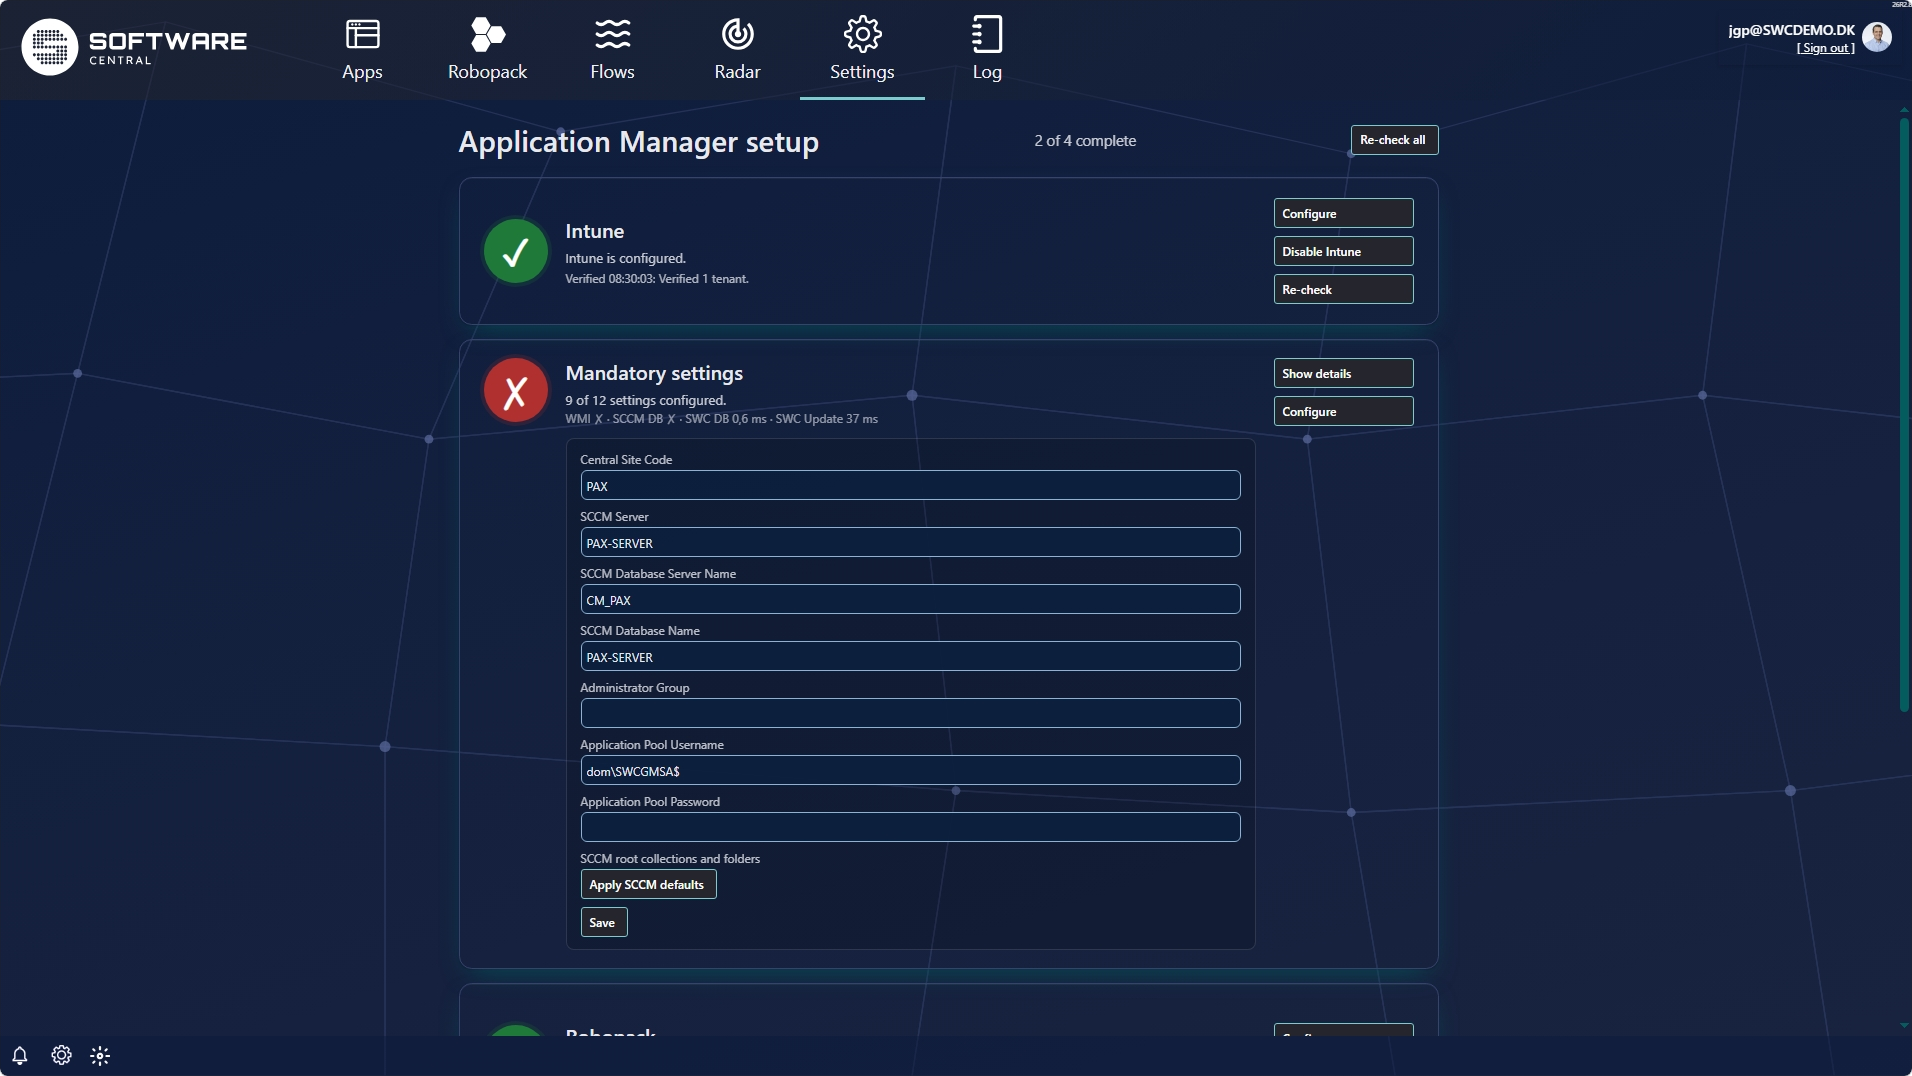
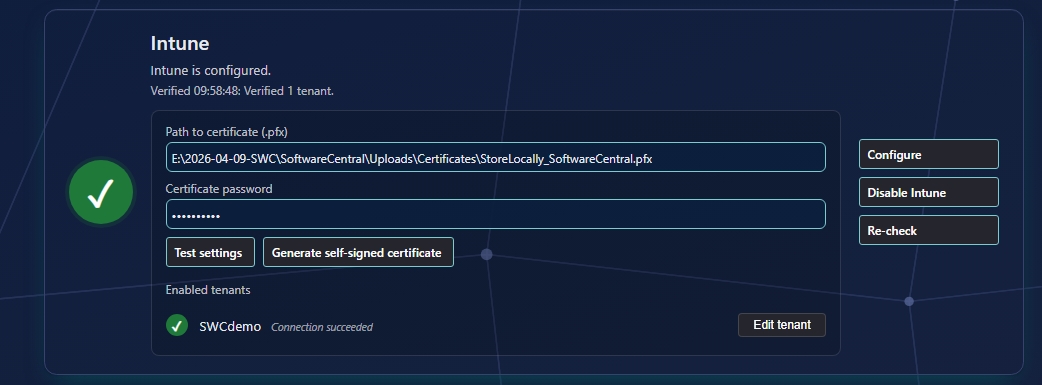
After the first-time wizard, the Application Manager Only edition opens its own guided checklist at Settings → Setup Guide. Each card shows a status indicator (● done, ● attention, ● action required) with Configure / Re-check actions. Use Re-check all at the top when finished.
Card 1 — Intune
Connect & enable your Intune tenant(s)
Set the certificate path (.pfx) and password, or Generate self-signed certificate and upload the .cer to the app registration. Use Test settings, then enable tenants. Add or edit tenants inline.
Optional if you run ConfigMgr-only with no Intune targets.
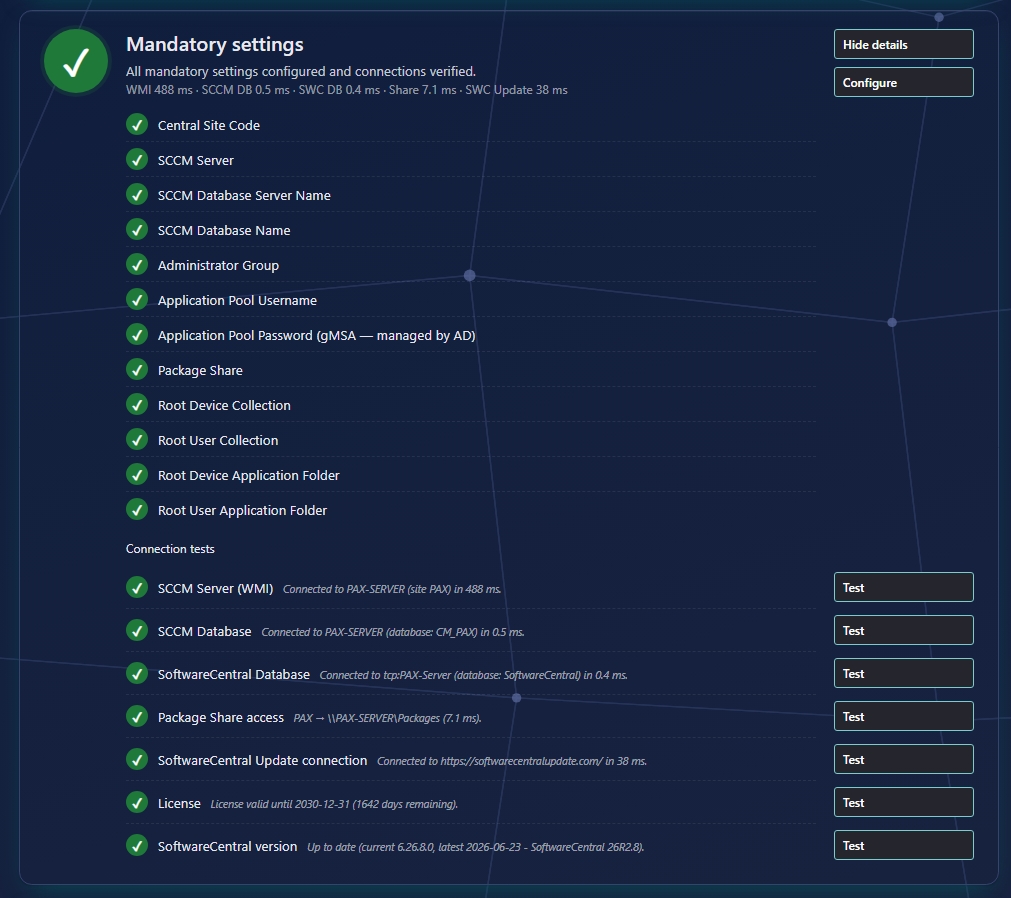
Card 2 — Mandatory settings & connection tests
Fill required settings and run every connection test
Click Show details / Configure to edit: Central Site Code, SCCM Server, SCCM DB server & name, Administrator Group, Application Pool user/password, one Package Share per site, and Apply SCCM defaults (creates default root collections and “Software Distribution” folders).
Run each test: SCCM Server (WMI), SCCM Database, SoftwareCentral Database, Package Share access, SoftwareCentral Update connection, License, and SoftwareCentral version.
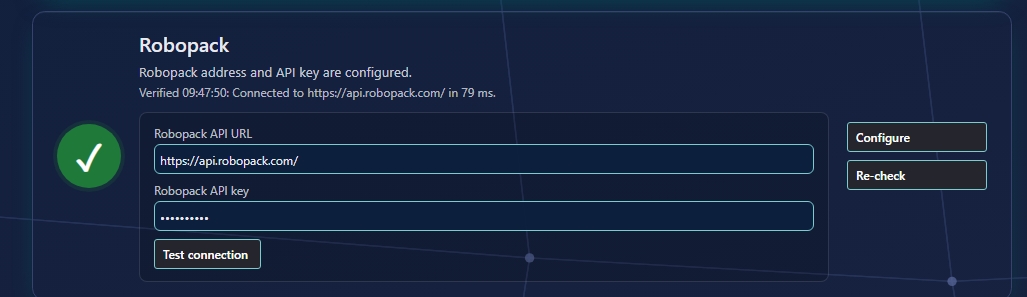
Card 3 — Robopack
Connect the Robopack service
Enter the Robopack API URL and API key, then Test connection. This powers the Robopack and Flows areas for automated packaging and updates.
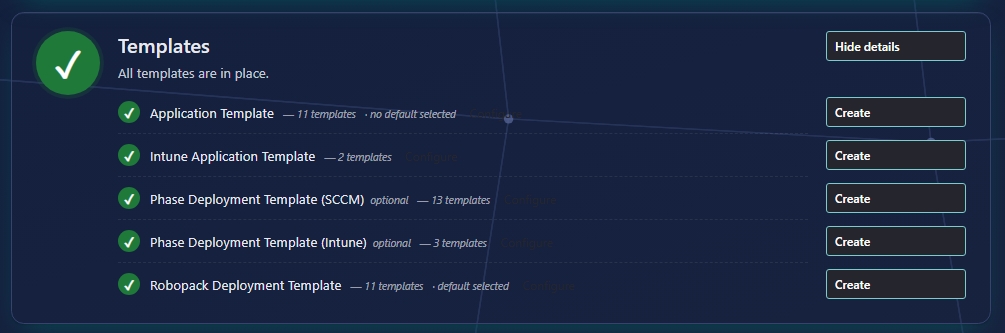
Card 4 — Templates
Create the templates you'll deploy with
Create at least an Application Template and a Robopack Deployment Template (a default of each is recommended). Intune Application Templates appear when Intune is enabled; Phase Deployment Templates (SCCM / Intune) are optional. Use Create per row or Configure to manage existing ones.
8 Hostname & HTTPS (remote access)
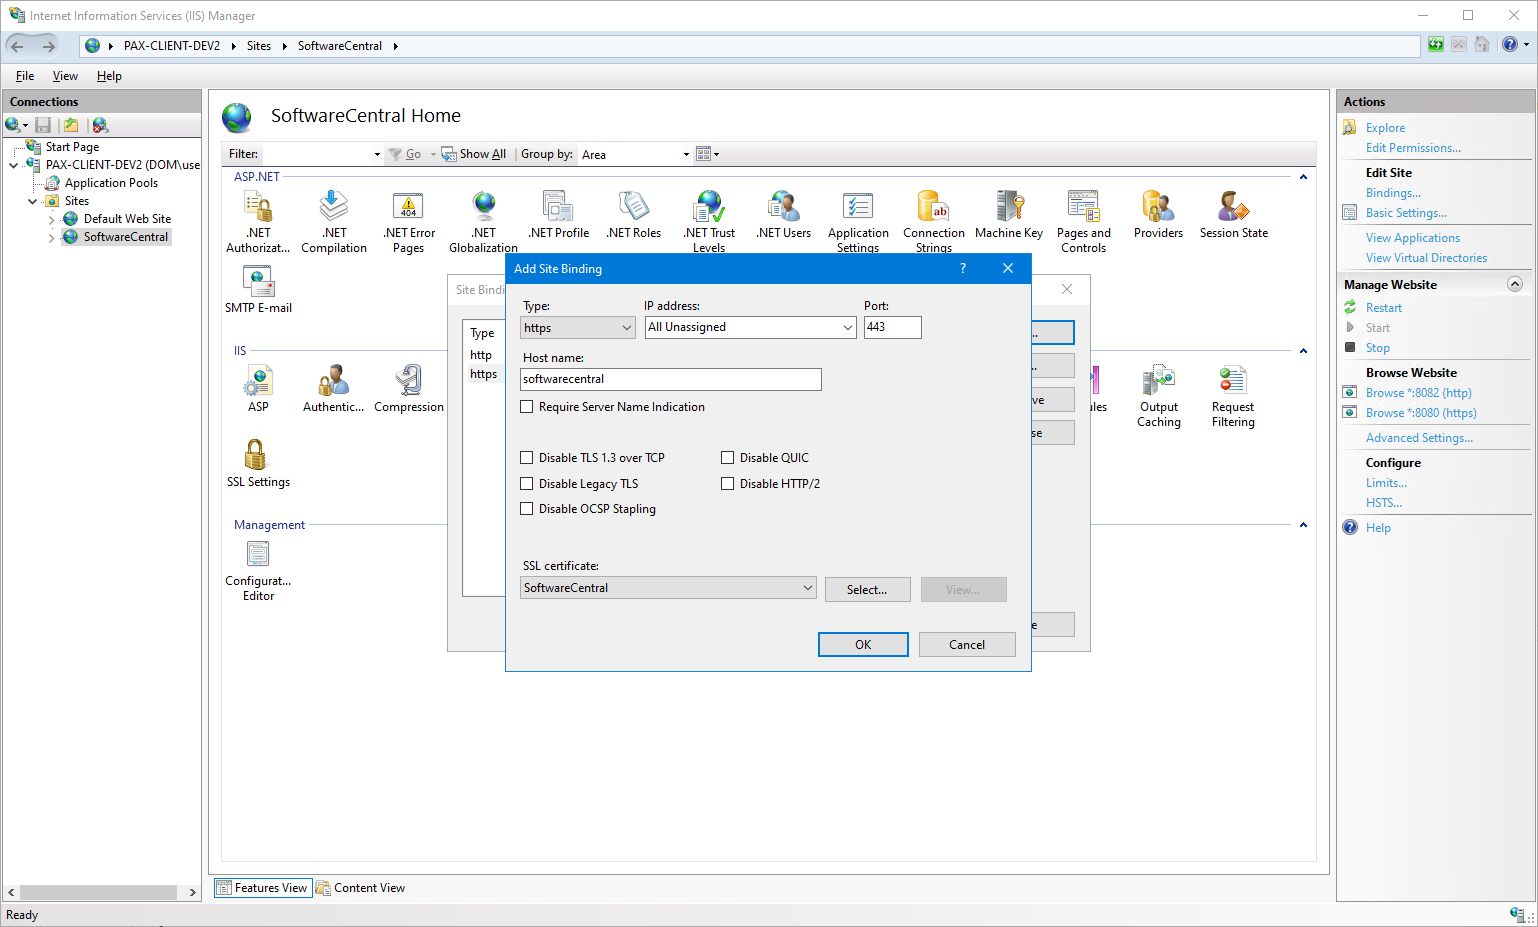
Give users a friendly, secure URL by adding an HTTPS binding for your host name.
- Configure the host name in DNS.
- In IIS Manager, add an https binding for the host name with a certificate your clients trust.
- Optionally add a port-80 binding for the same host name — a rewrite rule redirects users to https.
- Azure / Entra In the app registration, add the new host name to the Redirect URIs, and add the front-channel logout URL (
https://yourhost/logout) for single sign-out.
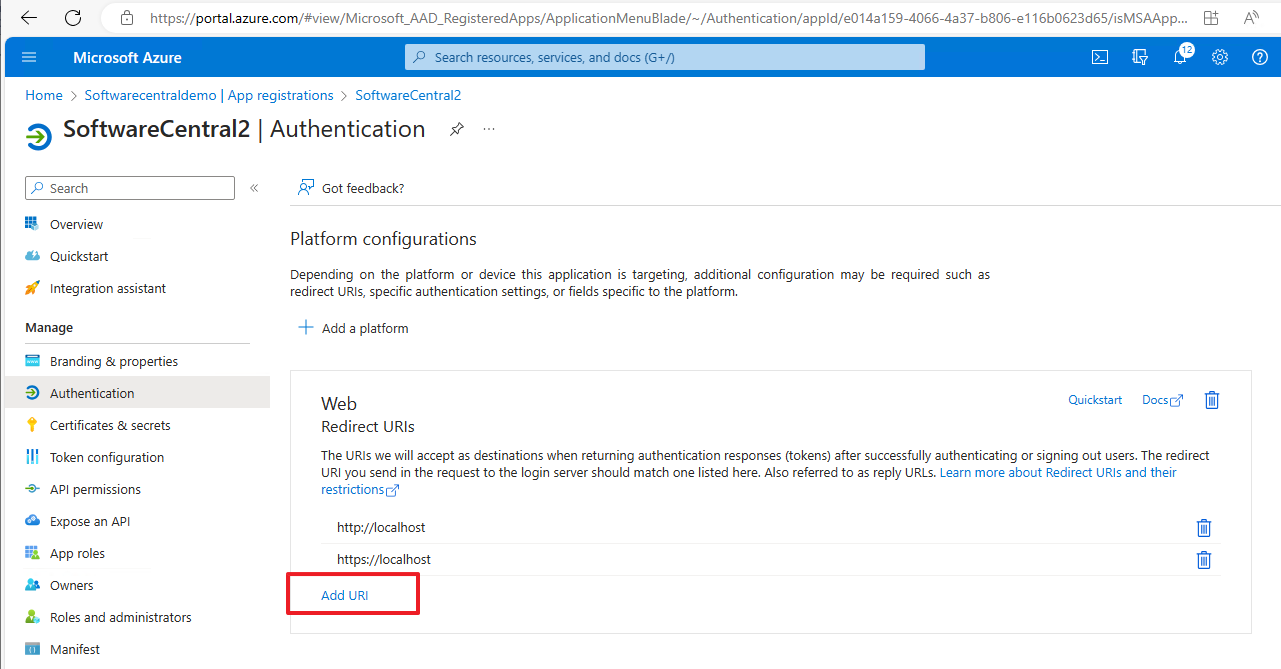
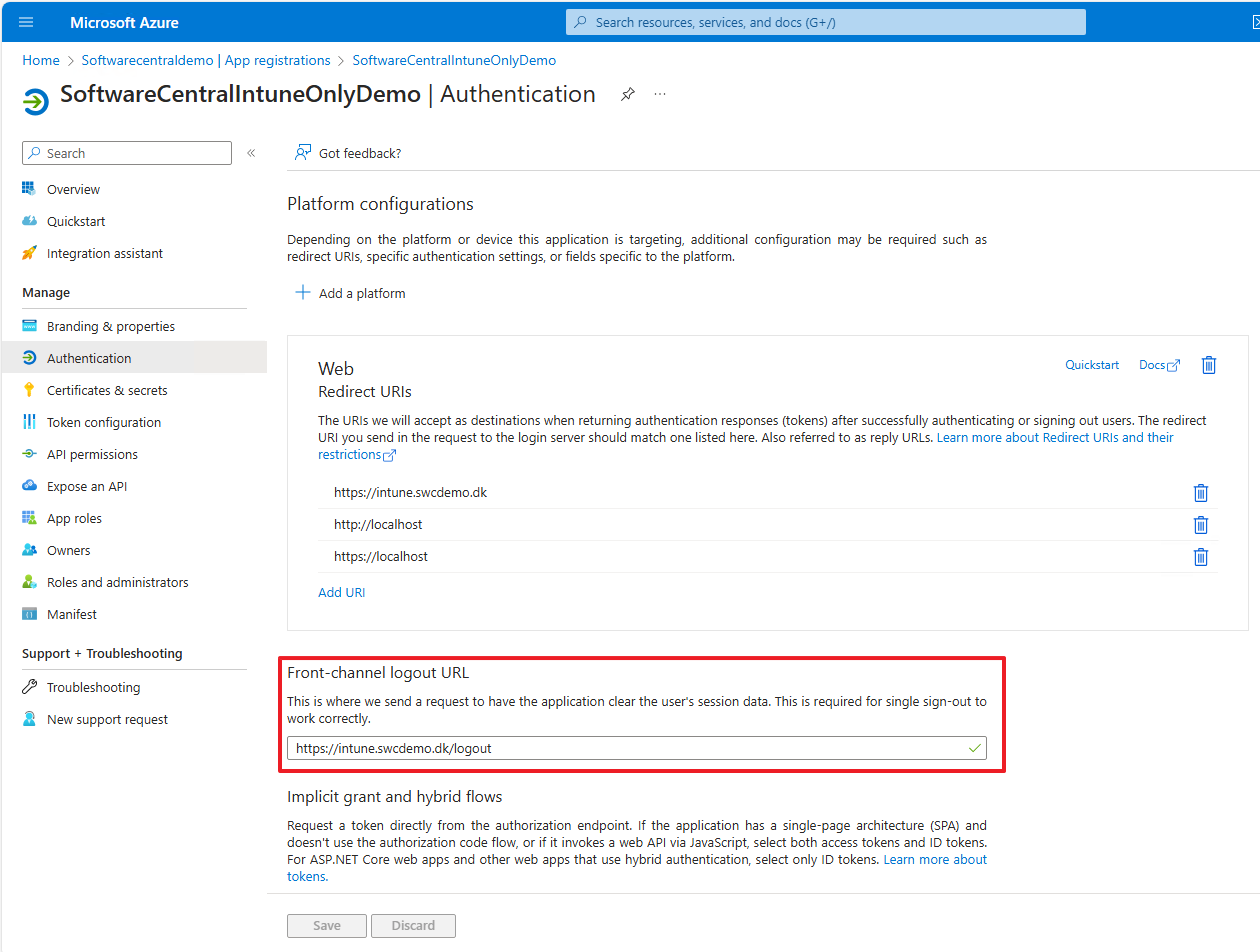
/logout) for single sign-out.📄 Detailed page: Hostname & HTTPS · original: Configure HTTPS
9 Verify & performance
9.1 — SoftwareCentral service
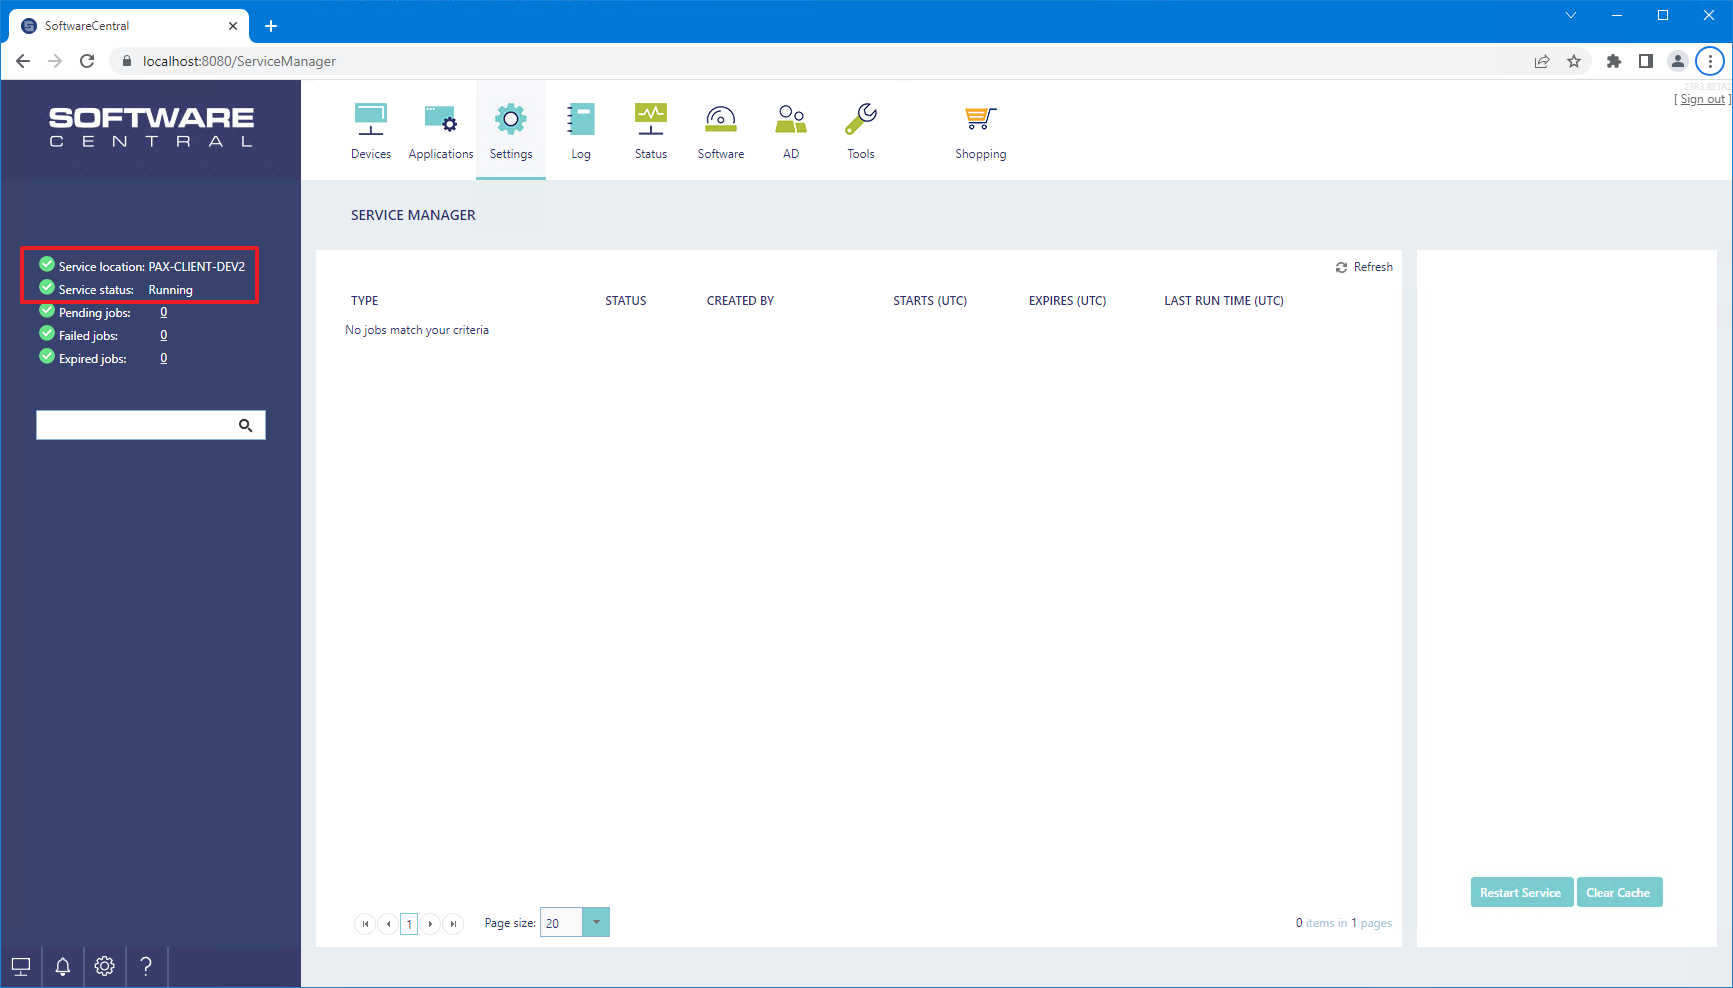
A Windows service handles long-running tasks and schedules, installed automatically. Confirm it under Settings → Service Manager. If it isn't running, the Log explains why and how to fix it.
9.2 — Performance tuning (optional)
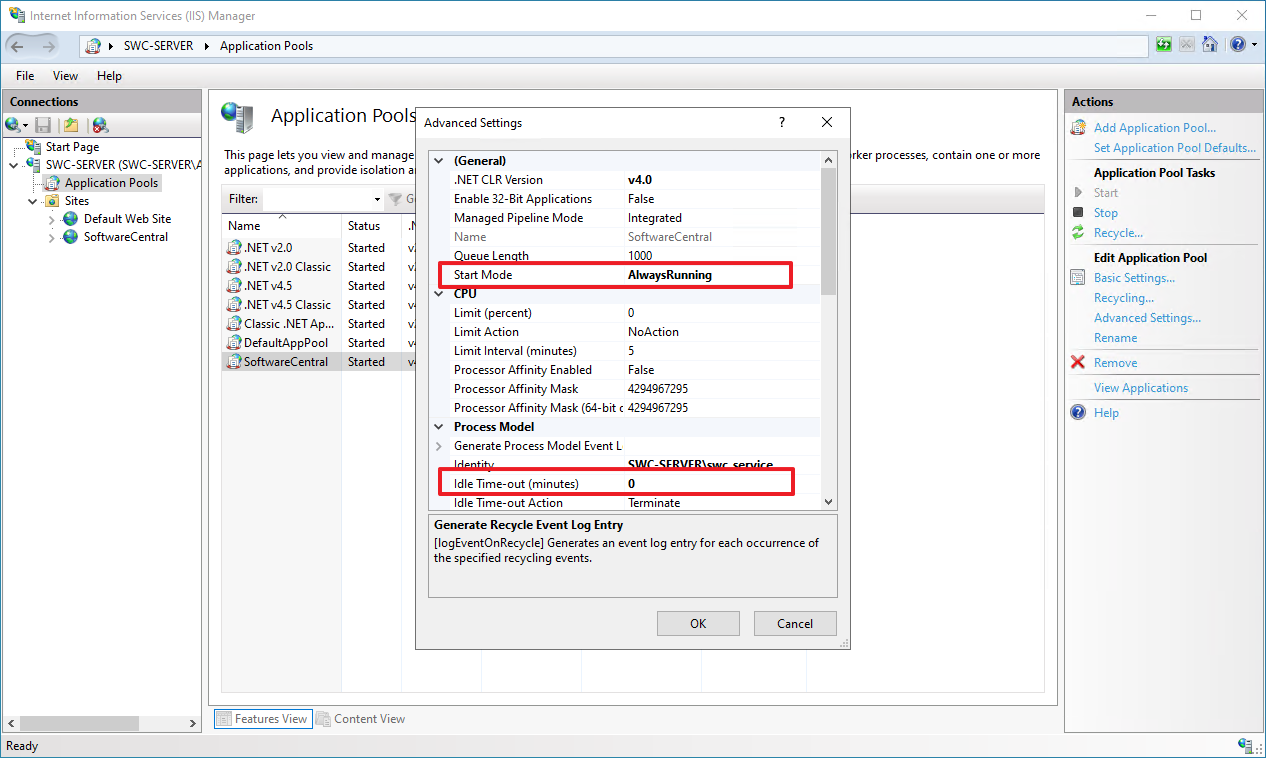
- Application pool → Start Mode =
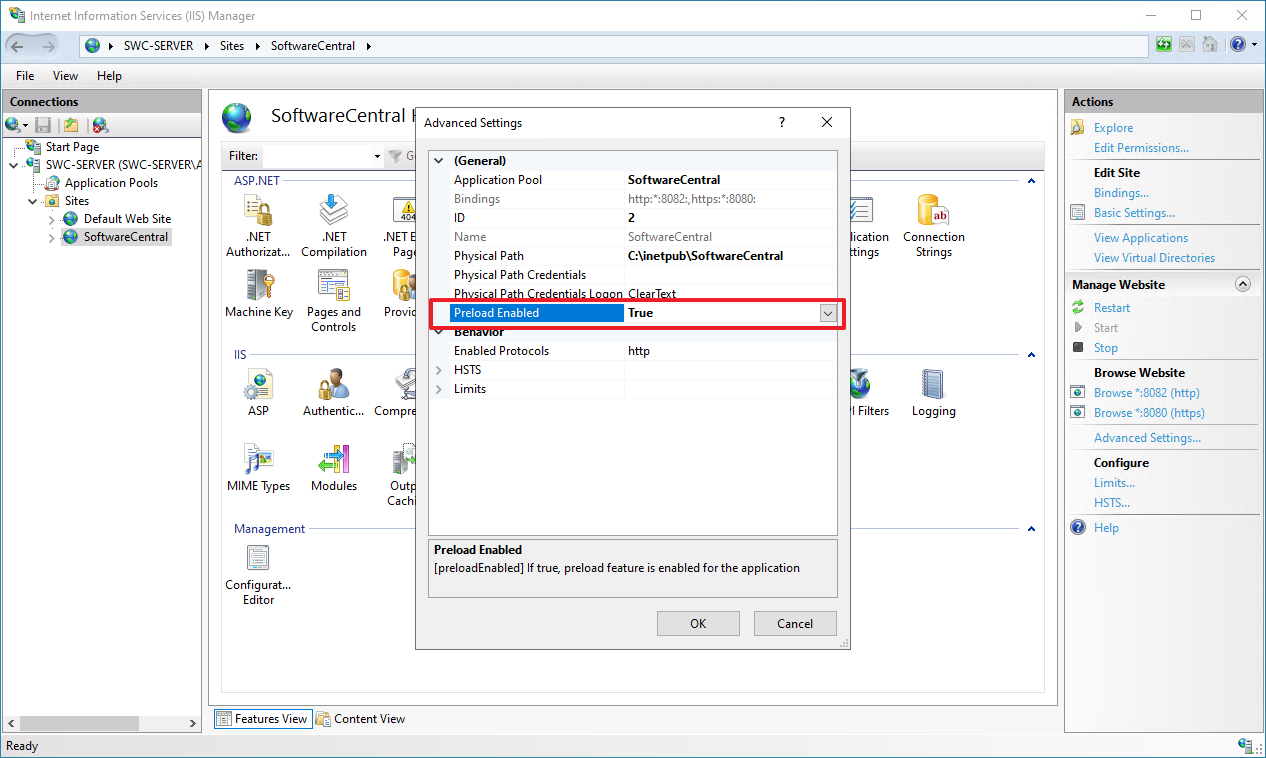
AlwaysRunning, Idle Time-out (minutes) =0. - Site → Advanced Settings → Preload Enabled =
True.
10 Appendix & references
Firewall ports (ConfigMgr / hybrid)
| Port | Purpose |
|---|---|
| 443 / 80 | HTTPS / HTTP to the site |
| 1433 | Database connections |
| 135 (+ range) | WMI calls |
| 2701 / 2702 | Remote Control Tool (ConfigMgr) |
| 389 / 636 | LDAP / LDAPS |
| 445 | Read log files on clients |
| 137–139 | Network discovery (UDP/TCP) |
ConfigMgr security role ConfigMgr
Import this XML in the ConfigMgr console → Administration → Security → Security Roles → Import to grant the service account the exact permissions SoftwareCentral needs.
Show SoftwareCentral ConfigMgr security role XML
<SMS_Roles>
  <SMS_Role CopiedFromID="SMS0009R" RoleName="SoftwareCentral" RoleDescription="">
    <Operations>
      <Operation GrantedOperations="1890811559" ObjectTypeID="1" />
      <Operation GrantedOperations="805446663" ObjectTypeID="2" />
      <Operation GrantedOperations="524289" ObjectTypeID="6" />
      <Operation GrantedOperations="140295" ObjectTypeID="7" />
      <Operation GrantedOperations="537011207" ObjectTypeID="9" />
      <Operation GrantedOperations="1031" ObjectTypeID="11" />
      <Operation GrantedOperations="813835269" ObjectTypeID="17" />
      <Operation GrantedOperations="140295" ObjectTypeID="19" />
      <Operation GrantedOperations="537011207" ObjectTypeID="20" />
      <Operation GrantedOperations="805448711" ObjectTypeID="31" />
      <Operation GrantedOperations="536871943" ObjectTypeID="33" />
      <Operation GrantedOperations="9" ObjectTypeID="42" />
      <Operation GrantedOperations="9" ObjectTypeID="43" />
      <Operation GrantedOperations="1031" ObjectTypeID="219" />
      <Operation GrantedOperations="142359" ObjectTypeID="224" />
      <Operation GrantedOperations="1031" ObjectTypeID="226" />
    </Operations>
  </SMS_Role>
</SMS_Roles>
Detailed guide pages
Other topics & original pages
- Intune Permissions · Intune Configuration
- Uninstall SoftwareCentral
- Original (full-product) pages: Prerequisites · App Registration · Install SoftwareCentral · Configure for the first time · Configure HTTPS