1 Open the page
Open the AD menu and choose Azure AD Users. The page lists the users of the Azure AD tenant, with the first page of users shown first.
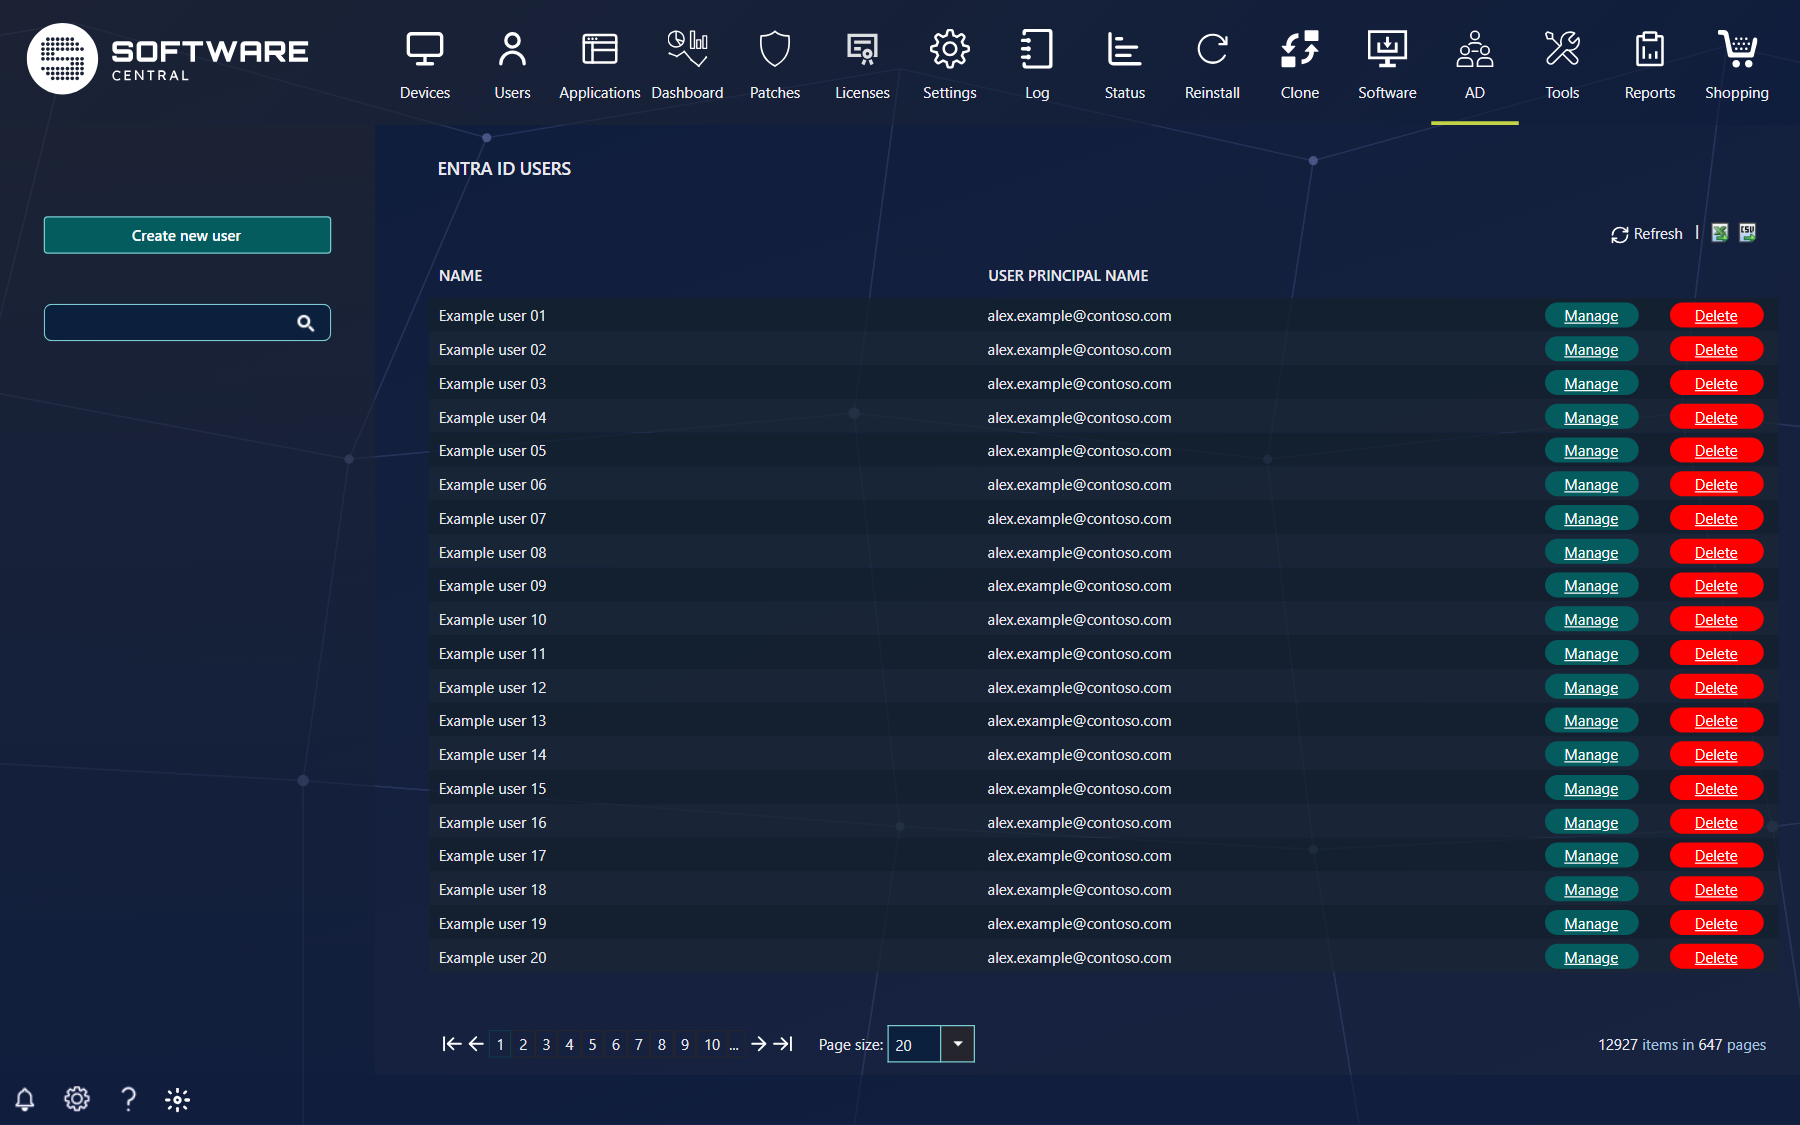
| What you see | What it does |
|---|---|
| Create new user (left) | Opens the Create new user window. It is shown only if your security role may create users. |
| Search box (left) | Finds users whose details contain the text you type. |
| Name and User Principal Name | The user's display name and sign-in name. If your role may view or manage users, the name opens the user's window. |
| Manage | Opens the user's window (see Manage a user). |
| Delete | Opens the delete window for that user. It is shown only if your security role may delete users. |
2 Create a user
Click Create new user on the left. The window opens with the settings below. Only the fields marked as required must be filled in.
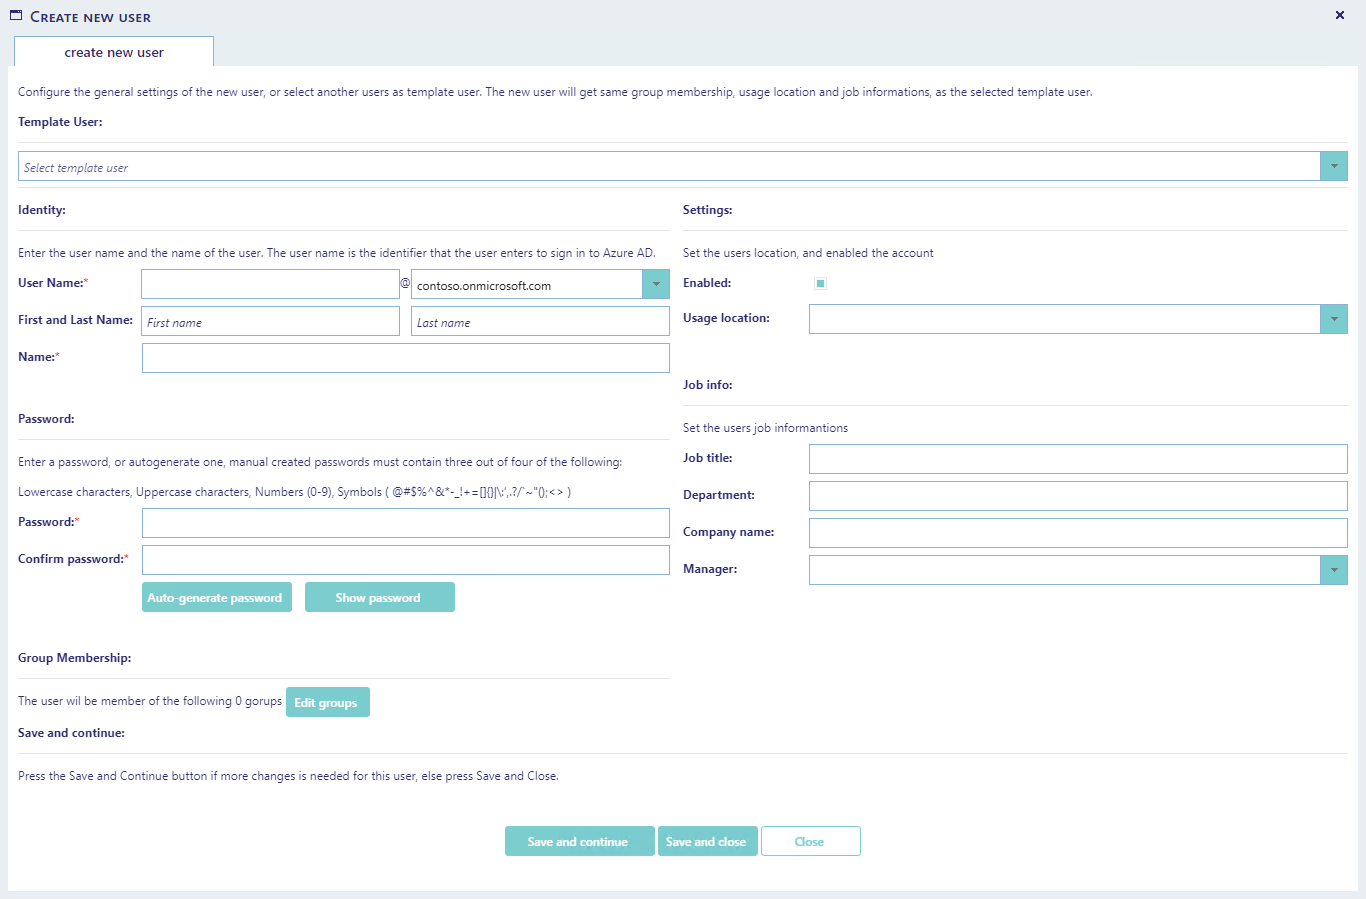
| Setting | What to enter or what happens |
|---|---|
| Template User | Optional. Select another user to copy from. The new user gets that user's job title, company, department, manager and usage location, and the template user's groups are added to the group list. The groups are added to the new user when you save. |
| User Name (required) | The part of the sign-in name before the @. Choose the domain after the @ in the drop-down. |
| First and Last Name | Optional. When you leave either box, Name is filled with the first name, a space and the last name. |
| Name (required) | The display name of the user. You can type it yourself after the names are filled in. |
| Password and Confirm password (required) | The same password twice. A password typed in the window must contain three of the four kinds of character shown on the window: lowercase letters, uppercase letters, numbers and symbols. The new user must change the password at the next sign-in. |
| Auto-generate password and Show password | Creates a random password in the boxes, or shows the typed password in clear text. |
| Edit groups | Opens a list where you choose the groups the new user joins. |
| Enabled and Usage location | New accounts are created enabled. Usage location is optional and is saved with the user. |
| Job title, Department, Company name, Manager | Optional job details, saved with the user. |
Save the user with one of the buttons at the bottom of the window:
| Button | What happens |
|---|---|
| Save and continue | Creates the user and reopens the window on that user, so you can change more settings. |
| Save and close | Creates the user and closes the window. |
| Close | Closes the window without creating the user. |
3 Manage a user
Click the user's name, or Manage on the row. The window opens on the basic information tab. Other details are on the tabs contact & job information, on-premises & parental control and group memberships.
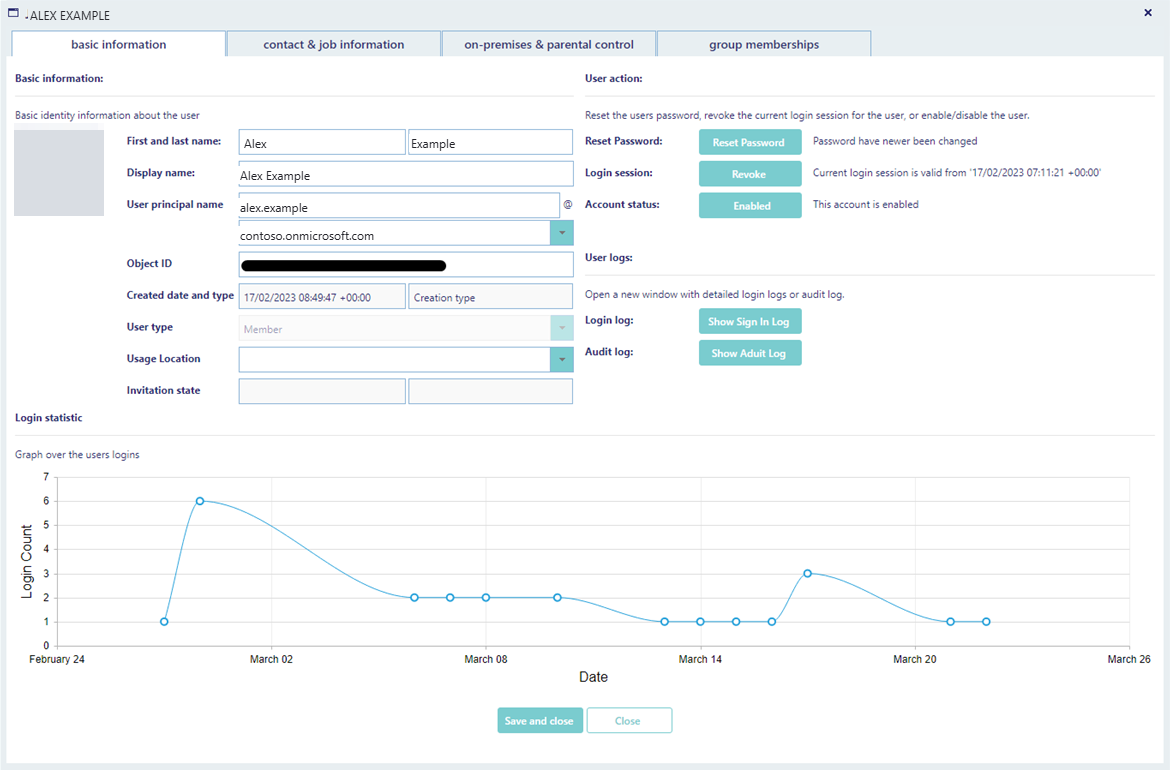
| Part of the window | What you can do |
|---|---|
| Profile picture | Click the picture to choose a new one. The picture selection opens in a new window. |
| Reset Password | Opens a box where you type a password, or click Auto-generate password, then Reset password. The user must change the password at the next sign-in. |
| Temporary Access Pass | Click Create to create a temporary access pass for the user. The box next to it shows whether a pass is active. |
| Revoke (login session) | Signs the user out of the current sessions. You are asked to confirm first. |
| Enabled / Disabled (account status) | Click the button to change the state. The change takes effect when you click Save and close. The button is available only if your security role may enable or disable users. |
| Show Sign In Log and Show Audit Log | Open a window with the user's detailed sign-in log or audit log. |
| Login statistic graph | Shows the number of logins for each date. |
When you manage an existing user, the window shows only Save and close and Close. Click Save and close to save any change you made on any tab.
4 Group memberships
Open the group memberships tab. The left list shows the groups the user is in, and the right list shows the groups you can add.
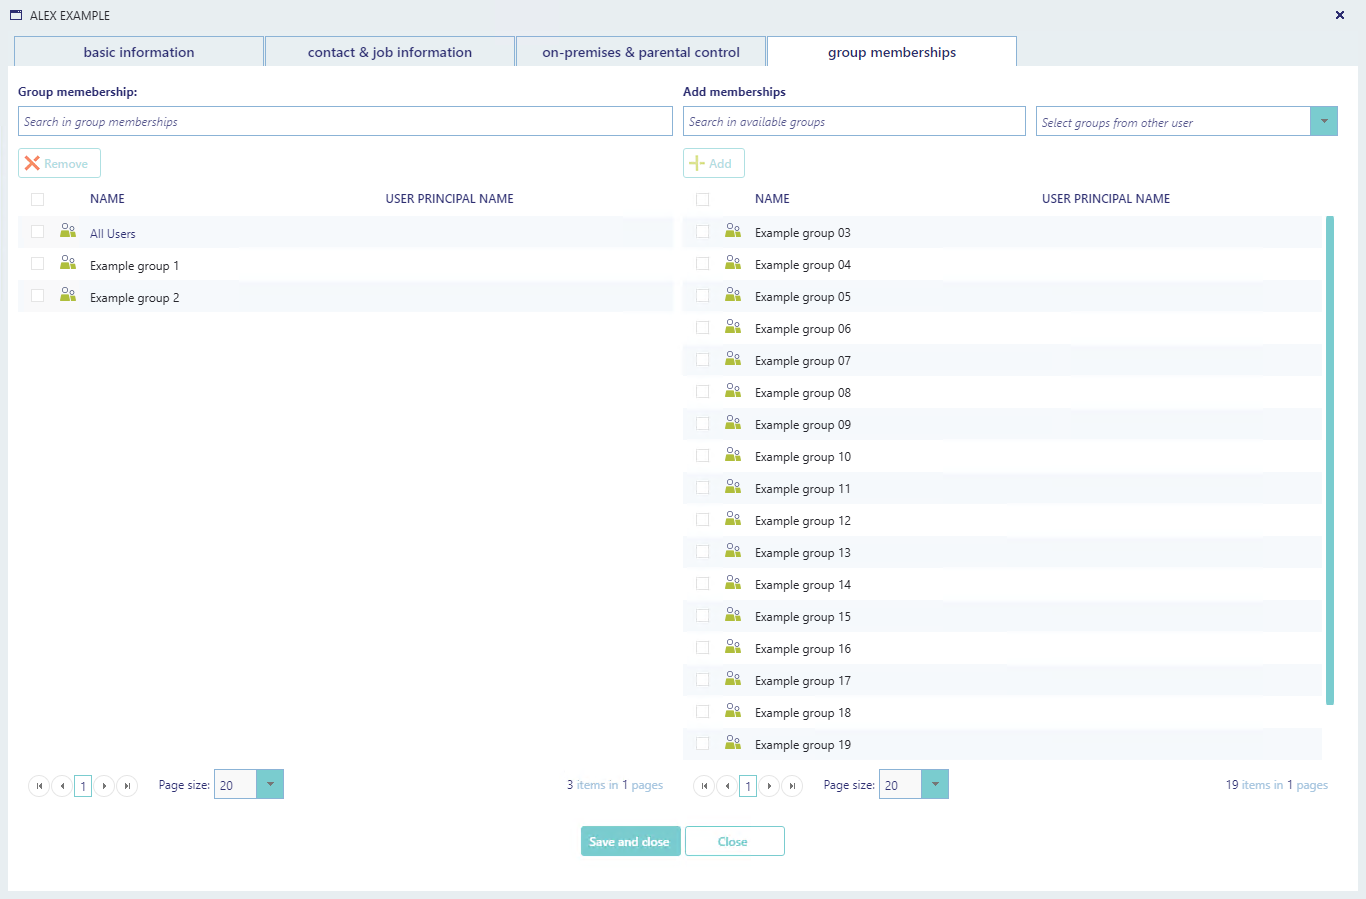
- Remove a group: tick the group in the left list, click Remove, and confirm.
- Add a group: tick the group in the right list, click Add, and confirm.
- Find a group: type in Search in group memberships or Search in available groups.
If the user has access, each group can also be opened and edited directly from this interface. Click the group's name.
5 Delete a user
Click Delete on the user's row. A window opens with the display name and the user principal name of the user, and the buttons Delete and Cancel.
Click Delete to remove the user from Azure AD. Click Cancel to keep the user.
6 Best practice
- Give each role only the rights it needs. Creating, viewing or managing, deleting, and enabling or disabling users are separate rights. A role that only checks users should not be able to delete them.
- Check the groups after you use a template user. The template user's groups are copied as they are. Remove any group the new user should not have before you save.
- Tell new users and users who get a reset password that they must change it at the next sign-in. SoftwareCentral always sets this on a new user and on a password reset.
- For a leaver, revoke the sign-in sessions and disable the account first. Delete the user only when the account must be removed from Azure AD.
7 Troubleshooting
| Symptom | Cause | What to do |
|---|---|---|
| "A name is required." | The Name box is empty. | Type the display name, or fill in First and Last Name so that Name is filled in. |
| "A user name is required." | The User Name box is empty. | Type the part of the sign-in name before the @. |
| "A domain is required." | No domain is selected after the @. | Choose a domain in the drop-down. |
| "A password is required." or "Password must be confirmed." | The Password or Confirm password box is empty. | Type the password in both boxes, or click Auto-generate password. |
| "The passwords are not the same." | The two password boxes do not match. | Type the same password in both boxes. |
| "User already exist." | A user with the same sign-in name already exists in the tenant. | Use another user name, or manage the existing user. |
| The tooltip "Your role is not allowed to change users account status" on the Enabled button | Your security role may not enable or disable users. | Ask an administrator to give your role the right to enable and disable users. |
| No Create new user button on the left | Your security role may not create users. | Ask an administrator to give your role the right to create users. |